Installing a GitFlic Runner agent with the shell type
Check the required agent version in the compatibility table and download it from the runner releases page. The latest runner version is available at the link.
- For agents version 1.7.1 and below, selecting the working directory is unavailable.
- The working directory for the agent is the gitflic-runner directory in the root of the home directory of the user who starts the agent.
- For the agent to work, it is recommended to create a separate user in the system who will start the agent.
Installing dependencies
-
Install java
- Check the available OpenJDK versions:
sudo apt policy openjdk-11-jdk- Install the package:
sudo apt install openjdk-11-jdk- Check the installed version:
java --version- Copy the axiom jdk deb package to the remote server
scp axiomjdk11-*.deb <username>@<ip>:~/- Install the package:
sudo apt install ./axiomjdk11*.deb- Check the installed version:
java --version -
Install git
sudo apt update && sudo apt install git -y
Installing the agent
-
Run the installation script
echo "deb [signed-by=/etc/apt/keyrings/gitflic.asc] https://registry.gitflic.ru/company/gitflic/package/-/deb  main stable" | sudo tee -a /etc/apt/sources.list.d/gitflic.list
sudo curl https://registry.gitflic.ru/company/gitflic/package/-/deb/dists/main/public-key.asc -o /etc/apt/keyrings/gitflic.asc
sudo apt update && sudo apt install gitflic-runner -yq
-
Create a temporary directory and extract the archive with the runner distribution into it.
sudo mkdir /tmp/gitflic-runner sudo unzip gitflic-runner_*.zip -d /tmp/gitflic-runner -
Create a working directory for the agent
sudo mkdir /opt/gitflic-runner -
Create additional directories required for operation
sudo mkdir /opt/gitflic-runner/build sudo mkdir /opt/gitflic-runner/cache sudo mkdir /opt/gitflic-runner/log -
Create the gitflic-runner user
sudo useradd --home-dir /opt/gitflic-runner --system --shell /bin/sh gitflic-runner -
Move or copy the runner.jar, helper.jar, helper.sh files to the /opt/gitflic-runner directory
sudo cp /tmp/gitflic-runner/runner.jar /tmp/gitflic-runner/helper.jar /tmp/gitflic-runner/scripts/helper.sh /opt/gitflic-runnerhelper.jar - an auxiliary file for operating the agent in shell/powershell mode. It is required for agents to work before the task is executed directly (downloading artifacts, preparing the cache, and so on), and after it is executed (downloading and uploading artifacts to GitFlic, uploading sast/dast/sca/unit-test reports, creating the cache, and so on).
-
Set the execute bit for the helper.sh script
sudo chmod +x /opt/gitflic-runner/helper.shhelper.sh - a shell script through which helper.jar is called with a different set of parameters. The CI/CD agent calls helper.jar through helper.sh in its work.
Without the helper.jar and helper.sh files, the agent will not be able to correctly execute tasks related to CI/CD.
Registering the agent
Go to the application web interface
GitFlic -> Admin panel -> СI/CD
http(s)://<Адрес веб интерфейса>/admin/runners
Agent registration on gitflic.ru is possible only at the company level
Company settings -> CI/CD agents*
https://gitflic.ru/company/<company_name>/setting/cicd/runners
-
Copy and save the URL and Token
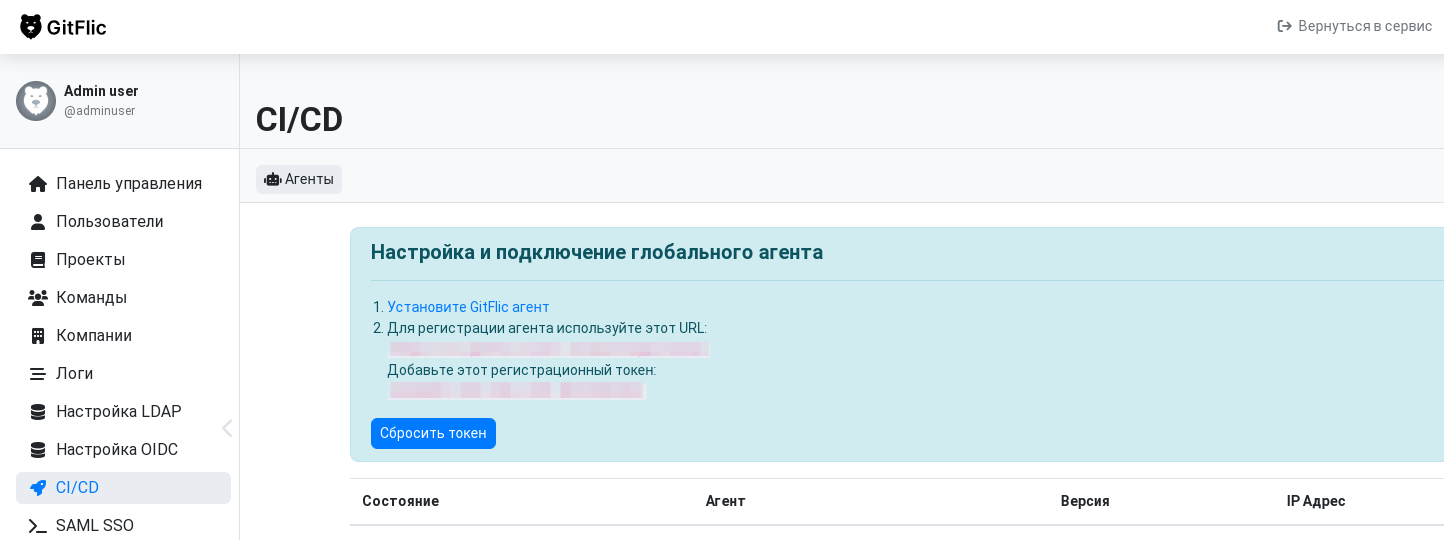
-
Go to the directory with the runner.jar executable file
cd /opt/gitflic-runner -
Run the registration command
sudo java -jar runner.jar register --url <url> --registration-token <token>Key Required Description --url \<url\>Yes URL copied in step 3 --registration-token \<token\>or--token \<token\>Yes Token copied in step 1 --name \<name\>No Agent name --tags \<tags\>No Agent tags (comma-separated) * If registration completes successfully, a corresponding record indicating that the agent is connected to the application will appear in the application web interface on the tab from step 1.
* The config directory containing the application.properties file will be created in the working directory.
-
Add the required startup parameters to the config/application.properties file.
runner.executor=shell
runner.workingDir=/opt/gitflic-runner
runner.helperDir=/opt/gitflic-runner
logging.file.name=/opt/gitflic-runner/log/server.log
logging.level.root=INFO
*If necessary, add additional parameters to the application.properties file created in step 4. The parameter descriptions are available on this page.
-
Set the owner of the directories to the gitflic-runner user
sudo chown -R gitflic-runner:gitflic-runner /opt/gitflic-runner
Starting the agent
Run the startup command
sudo -u gitflic-runner java -jar runner.jar start --config=config/application.properties
*--config= - Parameter specifying the location of the settings file.
-
Create a systemd unit file
touch /etc/systemd/system/gitflic-runner.service -
Insert the required startup parameters into the /etc/systemd/system/gitflic-runner.service file
sudo cat <<EOF >> /etc/systemd/system/gitflic-runner.service
[Unit]
Description=Gitflic-runner

[Service]
User=gitflic-runner
Group=gitflic-runner
WorkingDirectory=/opt/gitflic-runner
ExecStart=/usr/bin/java -jar runner.jar start --config=config/application.properties
ExecStop=/bin/kill -s 15 $MAINPID
StandardOutput=journal
StandardError=journal
Restart=on-failure
RestartSec=10
TimeoutStartSec=2min

[Install]
WantedBy=multi-user.target
EOF
/etc/systemd/system/gitflic-runner.service
[Unit] Description=Gitflic-runner [Service] User=gitflic-runner Group=gitflic-runner WorkingDirectory=/opt/gitflic-runner ExecStart=/usr/bin/java -jar runner.jar start --config=config/application.properties ExecStop=/bin/kill -s 15 $MAINPID StandardOutput=journal StandardError=journal Restart=on-failure RestartSec=10 TimeoutStartSec=2min [Install] WantedBy=multi-user.target -
Reload the units in the system
sudo systemctl daemon-reload -
Enable autostart and start the agent
systemctl enable gitflic-runner.service
systemctl start gitflic-runner.service
Selecting the registration scope for a Shell-type agent
A Shell-type agent executes task commands directly in the operating system of the host on which it is installed. All tasks processed by such an agent are run on behalf of one operating system user and use a shared working environment.
For this reason, a Shell-type agent is recommended for personal tasks or in an isolated environment with a limited set of projects. For registration at the company level or the entire instance level, agents with additional isolation should be used.
### When using a Shell-type agent is acceptable
A Shell-type agent can be used without additional isolation in the following cases:
- the agent is registered for a personal project;
- the agent is used by one owner or a limited set of trusted developers;
- the pipeline configuration is controlled by the owner of the working environment;
- there is no data or processes of other projects on the host;
- after tasks are completed, the working environment is cleaned or recreated;
- the agent performs specialized tasks that require direct access to the operating system.
Basic security recommendations in a private environment
The Docker agent type runs each task in a separate container. This is the simplest option for isolating tasks from different projects.
After the task is completed, the container is deleted unless otherwise provided by the configuration. Processes from one task do not continue running in the container of the next task.
Automated translation!
This page has been automatically translated. The text may contain inaccuracies.