Mass Import from GitLab
Available only in Self-hosted versions
For seamless migration from GitLab to GitFlic, a dedicated import mechanism is available. To import a single project, use this instruction. For migrating a large number of projects, users, groups, and settings, use one of the mass migration methods:
- Migration via the public API. This method allows migration from both cloud and on-premise GitLab instances, but only projects and their participants can be imported.
- Low-level migration. This requires database access to the GitLab instance but allows exporting more data.
Migration via GitLab Public API
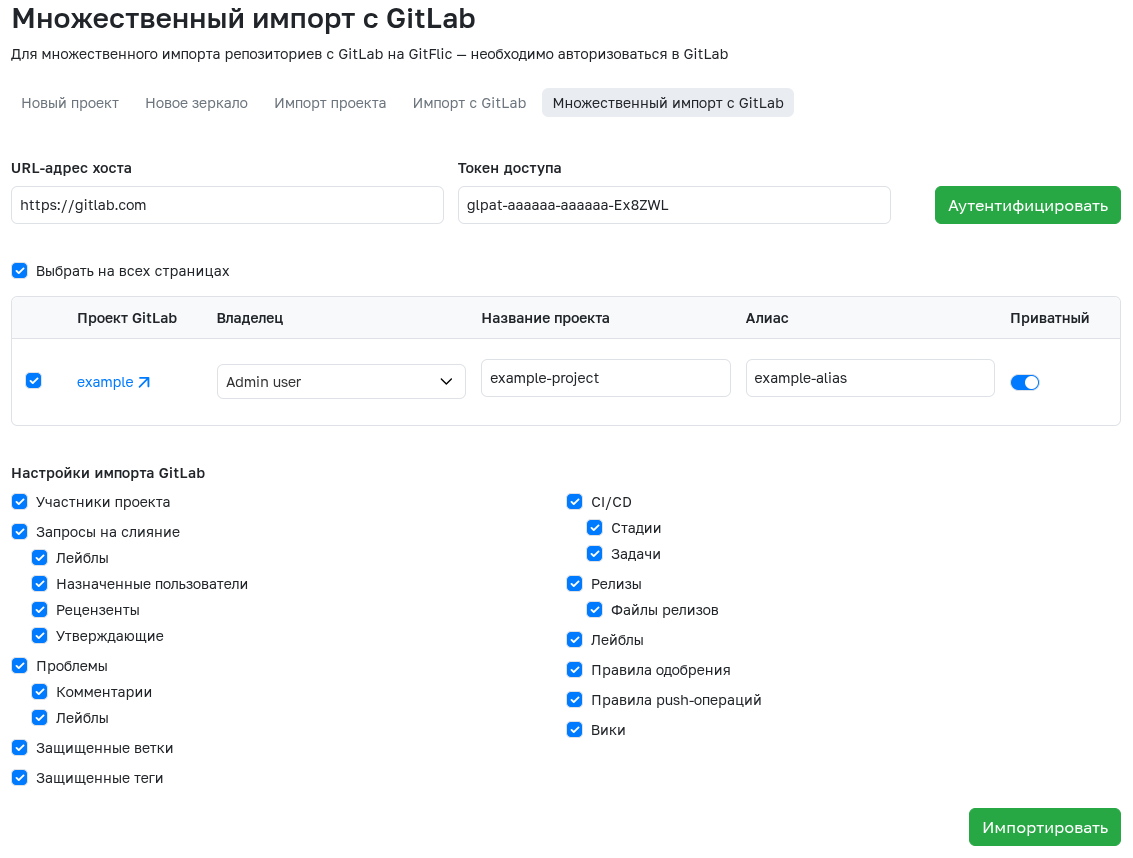
To access the mass migration page from GitLab, click the plus button in the upper right corner. Select Import Project to open the import creation page. Switch to the Multiple Import from GitLab tab to access the migration interface.
GitLab Authorization
This migration uses a GitLab Access Token with the api scope.
After entering the host URL (for example, https://gitlab.com or another for self-hosted instances), the access token, and clicking Authenticate, you’ll see a list of projects available to the token’s owner.
Configuring Projects for Migration
For each discovered project, you can modify these parameters before importing to GitFlic:
- Future owner
- Name
- Alias
- Privacy
By default, the owner is the GitFlic user performing the migration. To set a team or company as owner, create them before starting the migration.
You can also select which items to migrate per project: members, merge requests, issues, pipelines, releases, and some project settings.
After selecting projects for migration (using the checkbox beside each), click Import to start the process.
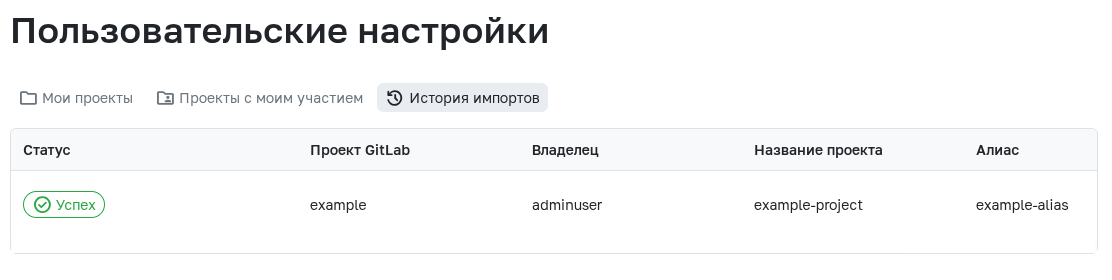
Migration Process
After starting, a import history page opens showing your selected projects and their current migration status. Errors will also be displayed here.
Low-level Migration
Supported GitLab versions
- This migration requires GitLab version 14.0 or higher.
- Migration from GitLab 17.0 or newer is recommended.
This migration uses the GitFlic CLI, shipped in the GitFlic archive.
Prerequisites
Before starting migration, ensure:
1.1. The GitFlic config file (application.properties) contains these parameters:
| Parameter | Required | Type | Description |
|---|---|---|---|
export.gitlab |
Yes | Boolean | Enables migration. Set to true. |
spring.datasource.gitlab.url |
Yes | String | GitLab DB connection URL |
spring.datasource.gitlab.username |
Yes | String | DB username |
spring.datasource.gitlab.password |
Yes | String | DB password |
gitlab.version |
Yes | Integer | GitLab major version (e.g. 17) |
gitlab.export.dbKeyBase |
Optional | String | Key for encrypted data (for mirrored projects, webhooks, CI/CD variables). For Omnibus installs, find this at /etc/gitlab/gitlab-secrets.json |
1.2. To migrate LFS projects, add these parameters to application.properties:
| Parameter | Required | Type | Description |
|---|---|---|---|
import.lfs.enabled |
Yes | Boolean | Enables LFS migration. Set to true. |
import.external-server.login |
Yes | String | GitLab user login for remote LFS server requests |
import.external-server.password |
Yes | String | GitLab user password for remote LFS server requests |
import.external-server.host |
Yes | String | Remote LFS server host |
import.external-server.port |
Yes | Integer | Usually 443. Port for remote LFS server |
import.external-server.protocol |
Yes | String | Usually https. Protocol for remote LFS server |
User Authentication Data
For import.external-server.login and import.external-server.password, specify a GitLab user with access to all projects containing LFS files (ideally an admin). Projects whose LFS files are inaccessible to this user will not be imported.
2. Run the CLI as a user who has:
- Read access to the GitLab database
- Write access to
/var/gitflic/directories and the GitFlic database
3. Prepare an empty database for GitFlic. Migration is supported only to a clean database.
Starting GitFlic CLI
1. Unzip the GitFlic package:
unzip gitflic_4.0.0_free_onpremise.zip
2. Go to the CLI directory:
cd /path/to/arhive/cli
3. Make the CLI script executable:
chmod +x ./gitflic-cli.sh
4. Launch GitFlic CLI with the path to your GitFlic application.properties file:
./gitflic-cli.sh /path/to/application.properties
Exporting Data from GitLab
To export from GitLab:
export gitlab
The CLI will ask for the output directory for the exported gitflic-models archive. You can skip this and output will default to the CLI’s working directory, or specify it using:
--output-path <path/to/dir>
Short version:
-o <path/to/dir>
The program will then ask for the path to the GitLab config file (gitlab.rb or gitlab.yaml). This is optional, but needed for exporting LDAP connections. You can skip with -n or provide upfront:
--config-path <path/to/file>
Short version:
-c <path/to/file>
Example export command:
export gitlab \
--output-path /home/adminuser/gitLab-import \
--config-path /home/gitlab/gitlab.rb
Upon success, a message will be displayed in the terminal.
Importing Data to GitFlic
To import data into GitFlic:
import \
--archive-path <path/to/archive> \
--repository-dir-path <path/to/repos>
--archive-path: Path to thegitflic-modelsarchive from export.
Short versions:
--zip <path>or-f <path>
--repository-dir-path: Path to GitLab repositories, usually/var/opt/gitlab/git-data/repositories/.
For detailed logs, add --verbose (short: -v).
Example import command:
import \
-v \
--repository-dir-path /var/opt/gitlab/git-data/repositories/ \
--archive-path /home/adminuser/gitLab-import/gitlic-models-1742204395.zip
A message will be shown upon completion.
All migrated users will receive a temporary password. In the directory with GitFlic CLI, a file named generated-password.txt will be created containing these temporary passwords. After first login, users must change their password.
Automated translation!
This page was translated using automatic translation tools. The text may contain inaccuracies.