Installing GitFlic Runner with PowerShell Type
Check the compatibility table for the required agent version and download it from the runner releases page. The latest runner version is available here.
- For agents version 1.7.1 and below, working directory selection is not available.
- The default working directory is gitflic-runner in the home directory of the user running the agent.
- It's recommended to create a dedicated system user for running the agent.
* All following commands should be executed by the user that will run the agent
Dependency Installation
-
Install Java
Download Java 11 installer for Windows from this page.
-
Install Git
Download Git installer for Windows from this page.
Agent Installation
1. Create gitflic-runner directory in home folder
New-Item -ItemType Directory $env:USERPROFILE\gitflic-runner
2. Create build, cache and data\log subdirectories
New-Item -ItemType Directory $env:USERPROFILE\gitflic-runner\build
New-Item -ItemType Directory $env:USERPROFILE\gitflic-runner\cache
New-Item -ItemType Directory $env:USERPROFILE\gitflic-runner\data\log
3. Copy runner.jar and helper.jar to gitflic-runner directory
Copy-Item .\helper.jar,.\runner.jar $env:USERPROFILE\gitflic-runner
helper.jar - auxiliary file for agent operation in shell/powershell mode. Required for pre-task operations (downloading artifacts, cache preparation) and post-task operations (uploading artifacts/reports to GitFlic, creating cache etc.).
4. Copy helper.bat from powershell-scripts directory
Copy-Item .\scripts\helper.bat $env:USERPROFILE\gitflic-runner
helper.bat - batch script that calls helper.jar with various parameters. The CI/CD agent executes helper.jar through helper.bat.
Without helper.jar and helper.bat files, the agent cannot properly execute CI/CD tasks.
Agent Registration
-
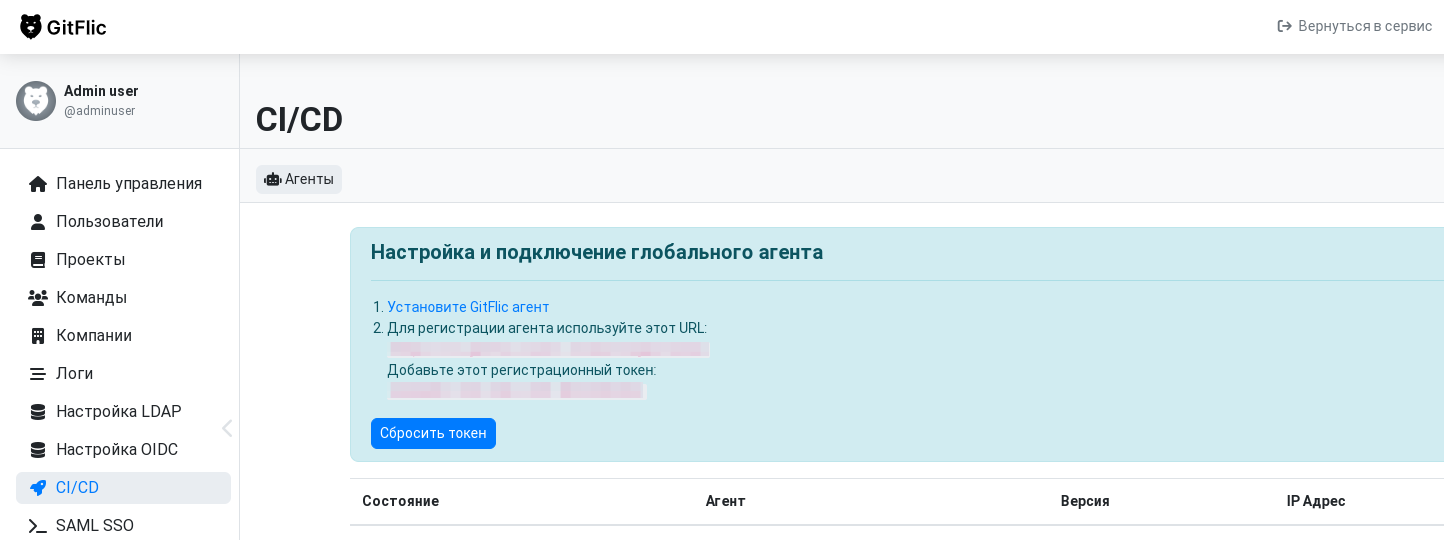
Access web interface
GitFlic → Admin Panel → CI/CD
http(s)://<Web Interface Address>/admin/runnersAgent registration on gitflic.ru is only available at company level
Company Settings → CI/CD Agents
https://gitflic.ru/company/<company_name>/setting/cicd/runners -
Copy and save URL and Token
-
Navigate to runner.jar directory
cd $env:USERPROFILE\gitflic-runner -
Run registration command
java -jar runner.jar register --url <url> --registration-token <token>Parameter Required Description --url <url>Yes URL copied in step 3 --registration-token <token>or--token <token>Yes Token copied in step 1 --name <name>No Agent name --tags <tags>No Agent tags (comma-separated) - Upon successful registration, the web interface will show the connected agent.
- A config directory containing application.properties will be created.

-
Add required parameters to config/application.properties:
runner.executor=powershell
logging.file.name=runner.log
logging.level.root=INFO
Add additional parameters as needed. See parameter reference.
Starting the Agent
Run startup command:
java -jar runner.jar start --config=config/application.properties
Automatic Translation!
This page has been translated using automated tools. The text may contain inaccuracies.