Registry Repositories
Functionality is available in Enterprise and Atlas versions.
Registry repositories - a platform feature that is a logical continuation of the container and package registry function. Unlike the general registry where, for example, Maven packages, Docker containers, and artifacts saved as Generic packages reside in a single shared registry, registry repositories store artifacts of only one specific type. The following features allow building any required file storage structure:
- Access to artifacts, including those in external registries
- Creating repositories at project, company, or entire service level
- No limitations on the number of repositories themselves
Creating a Registry Repository
Registry repositories can be created at three possible access levels - project, company, and entire service:
- Project - after creating a project, navigate to the Container and Package Registry section and select the Registry Repositories tab. Creating new Registry Repositories is available to project members with a role no lower than Administrator.
- Company - after creating a company, navigate to the Container and Package Registry section and select the Registry Repositories tab. Creating new Registry Repositories is available to company members with an Administrator role.
- Service - after going to the Admin Panel, go to the Package Registry tab in the Registry Repositories section. By default, the creation of new Registry Repositories is available only to Service Administrators.
Access to registry repositories at the service-wide level
The service-wide registry repositories are, by default, accessible to any user with read permissions. To override this behavior, enable admin panel setting and create Access.
After clicking the New Registry Repository button, a dropdown list will appear where you need to select the type of the new repository.
Local Registry Repository
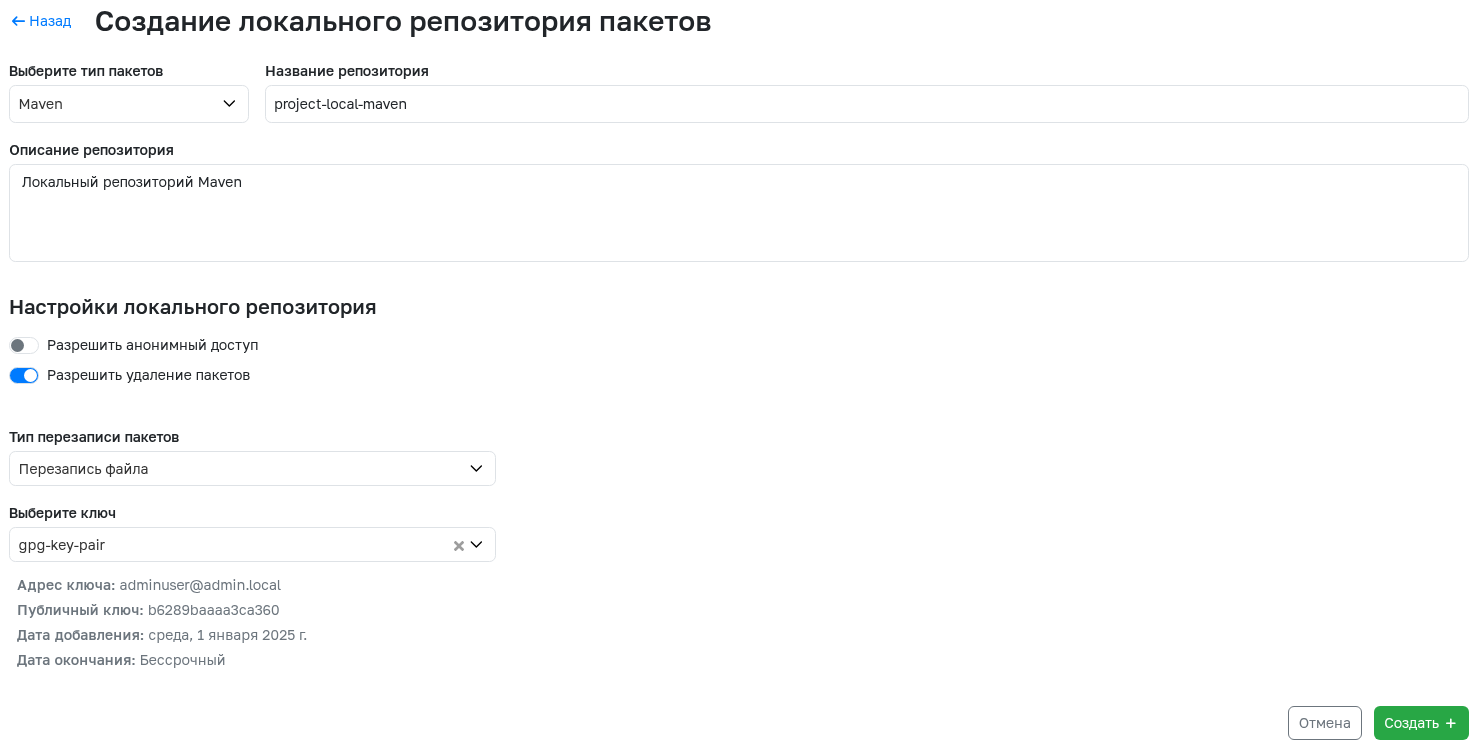
Represents a repository where you can upload your own packages or artifacts. To create, you need to specify:
- Package type - the specific type of packages that will be available for upload to the repository.
- Repository name - will be displayed in the general list of repositories. Can contain numbers, Latin letters, the
-symbol, and be no longer than 64 characters. - Repository description - any information about the repository that may be useful. Can contain up to 600 characters. Optional field.
- Anonymous access permission - determines whether package downloads via transport method from the repository are available to users without access to this repository.
- Package deletion permission - determines whether deleting any packages within this repository is allowed.
- Package overwrite type - determines whether overwriting existing packages within this repository is allowed.
- GPG key pair - required for signing Maven and Debian packages. Optional field.
Proxy Registry Repository
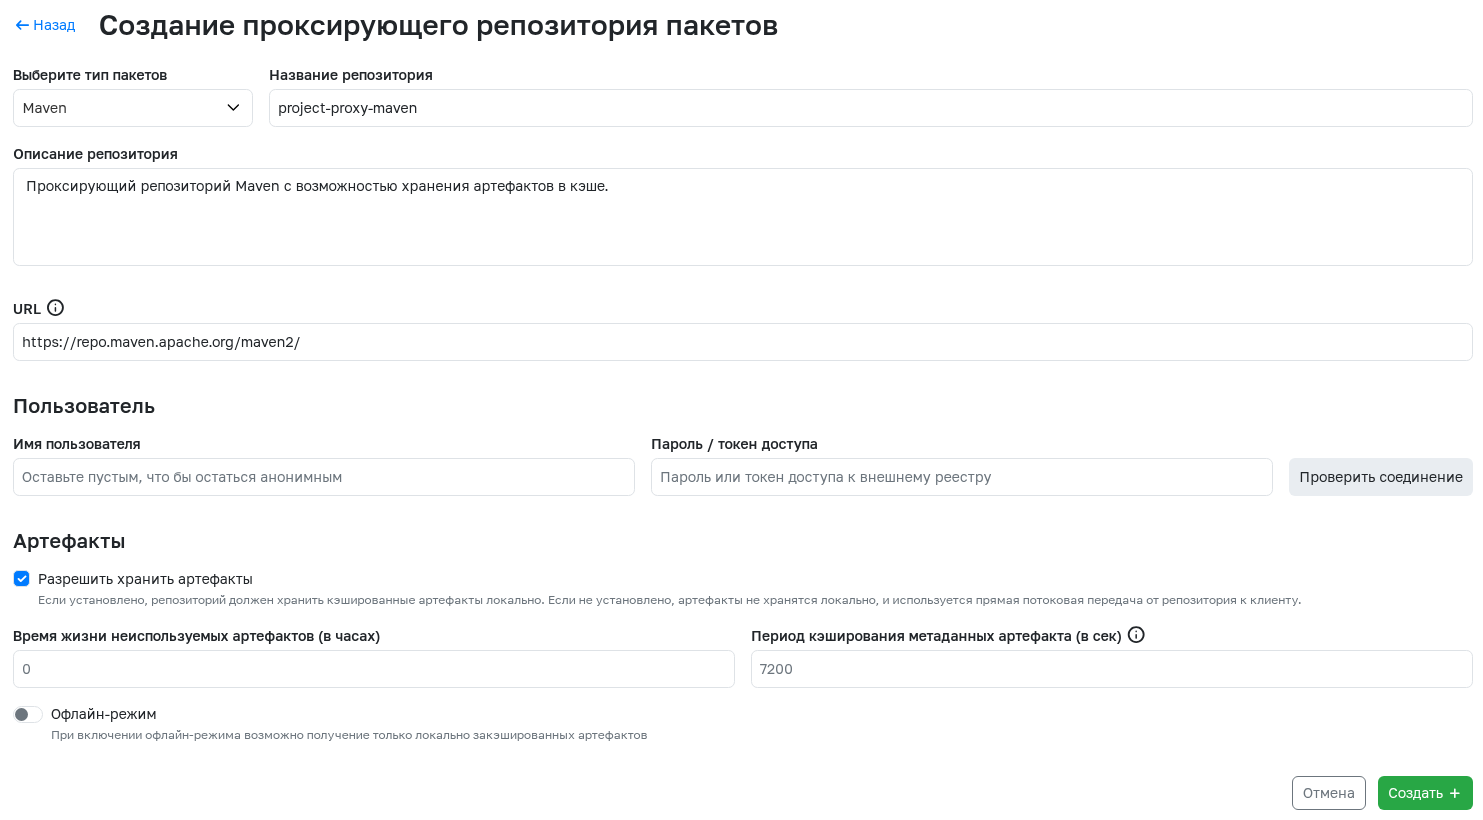
Acts as an intermediary that can be accessed to download packages from external repositories. To create, you need to specify:
- Package type - the specific type of packages that will be available for proxying. For proxy repositories, only the following package types can be selected: Maven, NPM, PyPi, NuGet, Container, Debian, Helm, Go.
- Repository name - will be displayed in the general list of repositories. Can contain numbers, Latin letters, the
-symbol, and be no longer than 64 characters. - Repository description - any information about the repository that may be useful. Can contain up to 600 characters. Optional field.
- URL - link to the external resource where requests will be proxied. For example,
https://index.docker.io. - Username and Password / access token - credentials for authorization in the external repository. A connection test button is available.
- Artifact storage permission - determines whether artifacts obtained from external repositories will be saved in the cache. Learn more about cache operation here.
- Unused artifact lifetime - specifies the number of hours an artifact will remain in the cache since its last download. A value of
0indicates no limit. - Artifact metadata caching period - number of seconds to cache metadata files before checking for new versions on the remote server. A value of
0indicates no caching. - Offline mode - determines whether artifacts can be obtained only from the local cache.
Storing Proxied Artifacts
If the proxy registry repository has the Artifact storage permission option enabled, all artifacts proxied from external registries will be saved in the local cache. A separate repository will be created for storage with a name derived from the proxy repository's name - <proxy-repository-name>-cache.
This type of repository cannot be Deleted. Instead, you need to edit the parent proxy repository and disable the Artifact storage permission option. Cache operation settings are configured via parent proxy repository settings.
Virtual Registry Repository
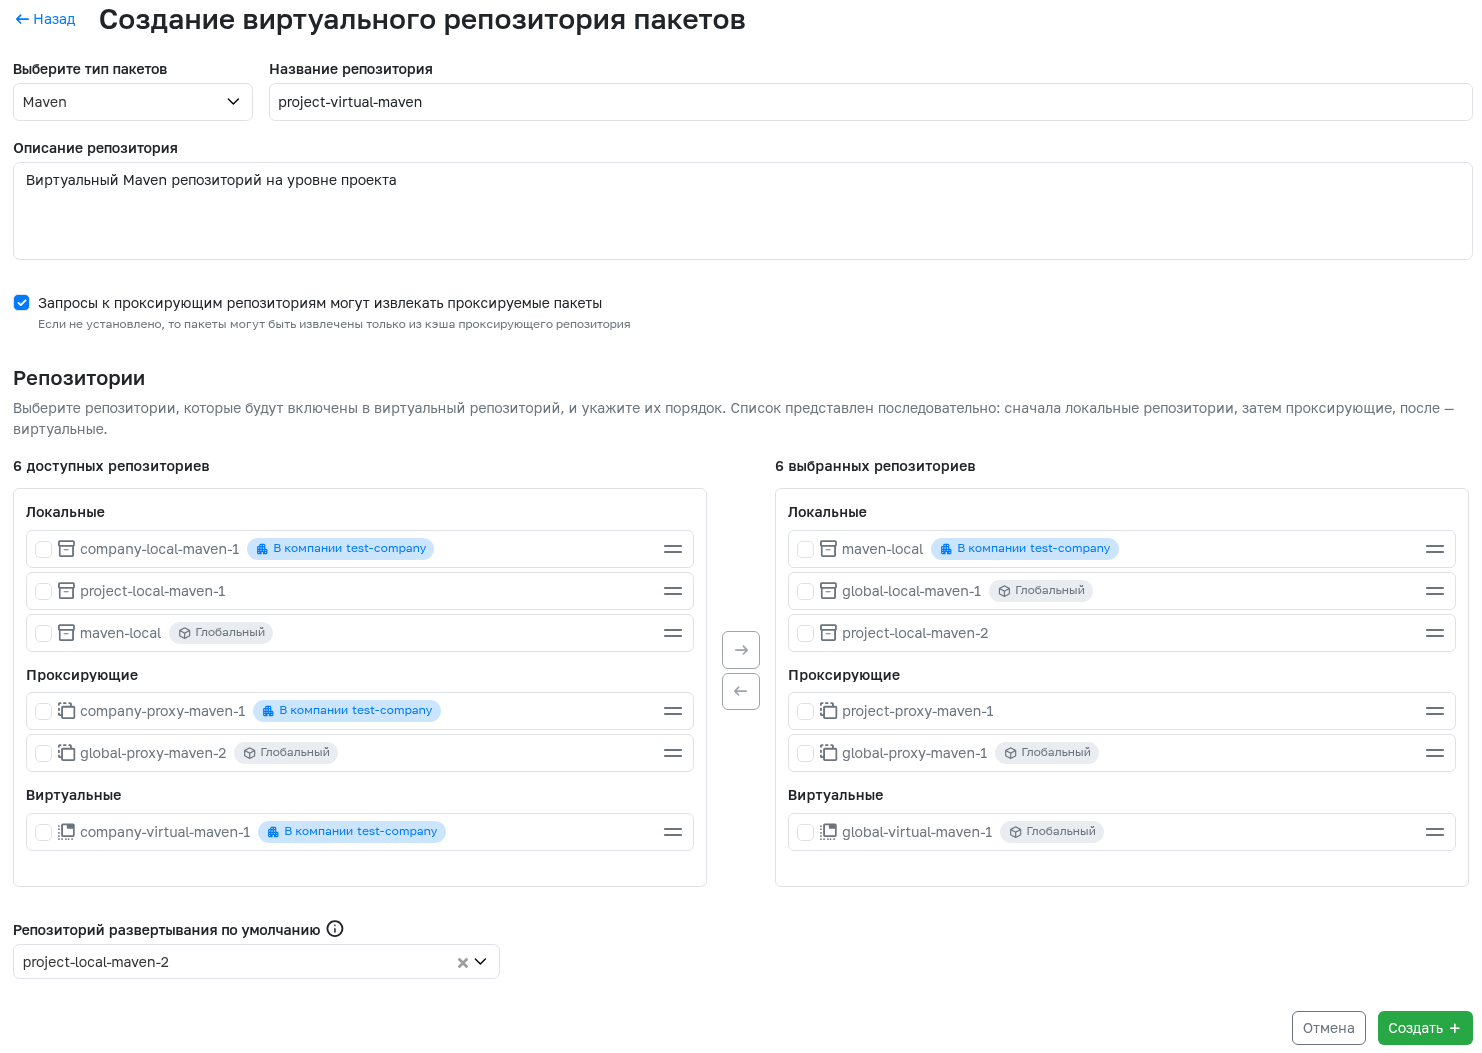
Allows building a chain from other registry repositories of any type to access artifacts via a single URL. To create, you need to specify:
- Package type - only repositories with this package type will be available for building the chain.
- Repository name - will be displayed in the general list of repositories. Can contain numbers, Latin letters, the
-symbol, and be no longer than 64 characters. - Repository description - any information about the repository that may be useful. Can contain up to 600 characters. Optional field.
- Requests to proxy repositories - determines whether requests to proxy repositories can access the external registry or only retrieve artifacts from the cache. This setting is available only if the package type is Maven, NPM, PyPi, NuGet, Container, Debian, Helm, Go.
- Repositories - list of repositories that will be included in the virtual repository in the specified order. When requesting artifacts, the virtual repository always searches for them in the following order: all selected local repositories in the specified order, then proxy repositories, followed by virtual ones. Only repositories higher in the hierarchy are available for selection. For example, when creating a repository at the project level, repositories from this project, the parent company (if the project is owned by that company), and the entire service will be available for selection.
- Deployment repository - a local repository where artifacts will be saved when uploaded to this virtual repository. Only repositories from the entity (project, company, or service) where this virtual repository is being created can be selected.
Publishing and Downloading Artifacts
Project or company members with a role no lower than Developer can publish artifacts to created local repositories, as well as virtual ones with a selected Deployment Repository. Downloading artifacts is available to any user with access to the registry repository. Artifacts can be published and downloaded both via the web interface and transport method.
Web Interface
To publish artifacts via the web interface, navigate to the Registry Repositories page and click the Upload button. After selecting the target repository, fields necessary for uploading the artifact will appear in the opened window. Depending on the package type specified for the selected repository, the set of fields will vary. After filling in the fields and selecting a file, click the Upload button to complete the artifact publication.
Target Path
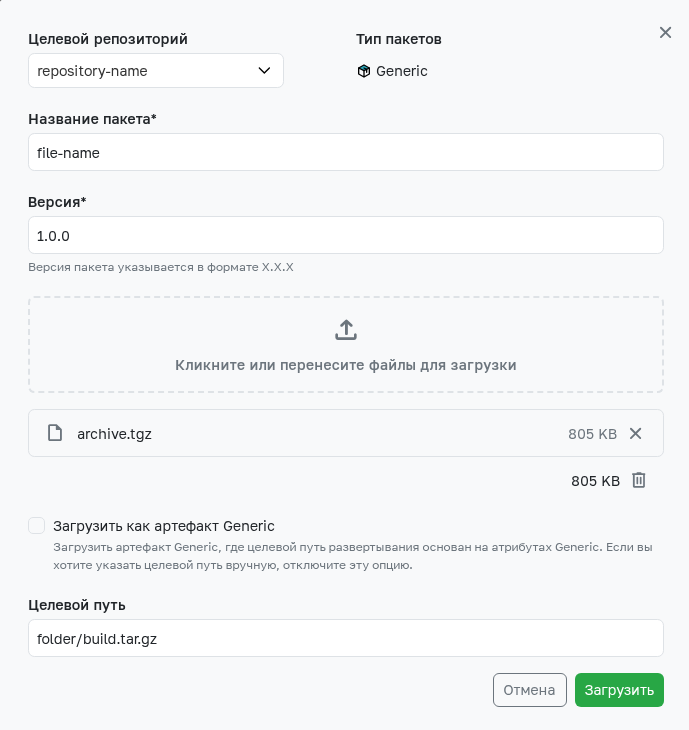
By default, uploading via the web interface occurs as an artifact of a specific package type - the path to the uploaded artifact is formed based on the filled fields and meta-information of the selected file. To upload an artifact with a specific path, use the Target Path - uncheck the option to upload the file as an artifact of a specific package type and specify the required path in the unlocked field.
Example of Target Path operation.
When uploading the file archive.tgz to the local repository repository-name with the Generic package type, specify Package name - file-name and its Version - 1.0.0. When uploading as a Generic artifact, the selected file will be available at the path: repository-name/file-name/1.0.0/archive.tgz. To upload an artifact to the path folder/build.tar.gz, specify this string (including the filename) in the Target Path field.
Transport Method
To interact with repositories via the transport method, you need to obtain a GitFlic transport token. Instructions for obtaining the token can be found on this page.
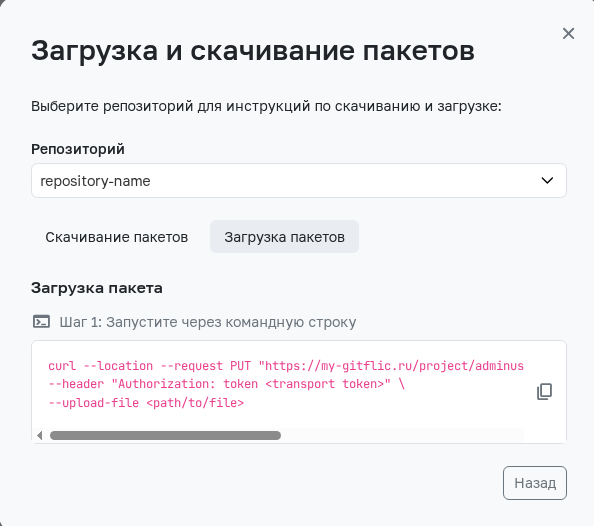
Depending on the repository's package type, the actions required for publishing or downloading via the transport method vary. To get instructions, navigate to the Registry Repositories page, click the Install button, and select a repository. To apply the commands, fill in the fields enclosed in angle brackets, e.g., <transport token> with the necessary values. All information required for uploading is available on the artifact description page, which can be opened by selecting the artifact in the file tree on the general Registry Repositories page.
Learn more about the general principles of package managers and their operation in the GitFlic registry on this page.
Deleting Artifacts and Repositories
Deleting repositories is available to users with a role no lower than Administrator in parent entities. Select the desired repository, click the Delete button, choose the Delete repository option, and confirm deletion by entering the control string.
Deleting individual files, folders, artifact versions, or entire contents is available to users with a role no lower than Developer in parent entities. Select the desired entity, click the Delete button, choose the appropriate deletion option, and confirm deletion.
Deleted files with all their contents will be moved to the Trash, located at the bottom of the file tree. If a file remains in the trash for more than 7 days, it will be automatically permanently deleted. For immediate deletion, the Empty Trash function is available. The standard time files remain in the trash can be changed using the gitflic.atlas.trash_can.lifetime parameter in the application.properties configuration file.
Access rights to registry repositories
By default, each user can view and download artifacts from the registry repositories at the Service level. Creating repositories and uploading artifacts are available only to Service Administrators. To redefine the rights, enable settings in the admin panel and create Access.
!!! info "Impact of accesses" Registry repository accesses can override the behavior of only for service-level repositories.
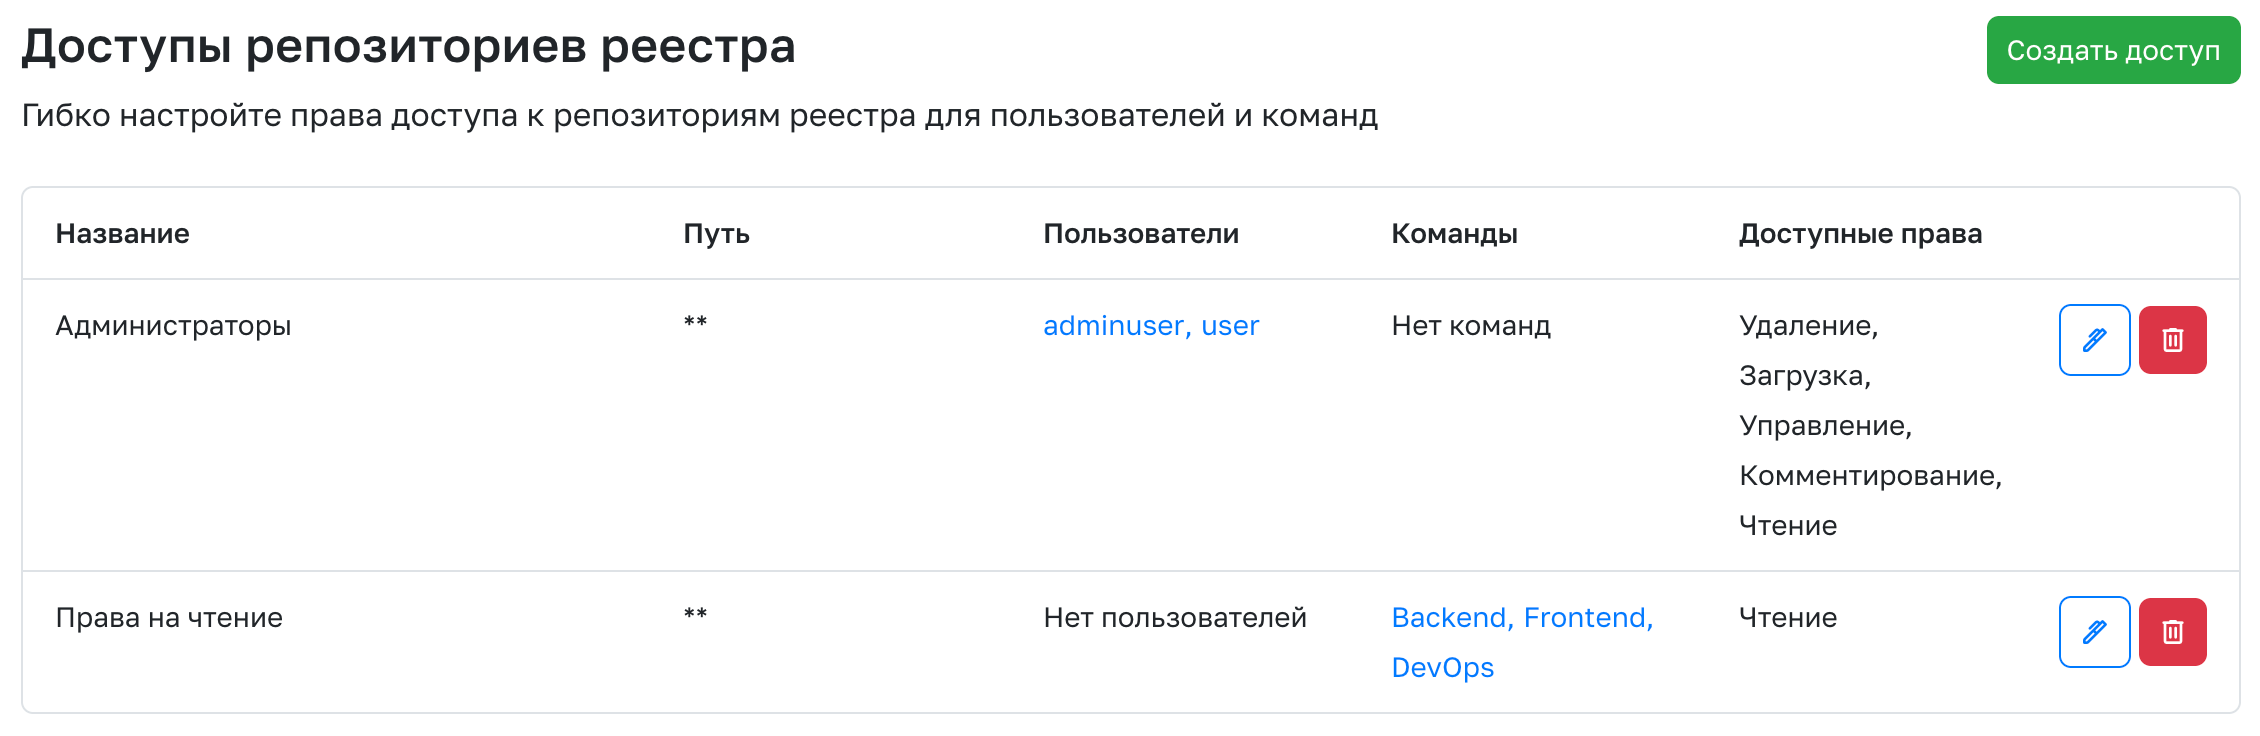
Only the Administrator of the service can create Access. After going to the Admin Panel, the [Settings] section(../../admin_panel/settings) must select the Registry Repository Access tab and click Create Access.
- Access Name is the name displayed in the list of all accesses.
- Path to the repository is a template in the
antMatchersformat for paths to repositories, access to which will be affected by the created rule.
Examples of path patterns
Examples of templates: my-*, team-?, **-proxy
* is a set of characters. For example, my-* will match my-generic, my-maven-2'. Does not matchmy/maven/test. <br>?is a single character. For example,team-?matches withteam-1', team-A'. Does not match withteam-frontend,team/backend. <br>
'** is a set of characters and slashes. For example, **-proxy will match gtlc-1-proxy, `gtlc-12/test-proxy'.
- Grant access - A list of users for whom the standard behavior will be overridden.
- Available Actions - A set of actions that will be available.
Available actions
- Reading - Browsing repositories and downloading artifacts.
- Upload - Create repositories and upload artifacts.
- Deletion - Deletion of repositories and artifacts.
- Management - Editing repositories and assigning properties for operation of cleaning policies.
After clicking the Create Access button, the new rule will appear in the list. To change or delete access, use the appropriate button.
Cleaning policies
Cleaning Policy — automated rules that help to remove outdated, unused or unnecessary artifacts from registry repositories.
Creating a cleaning policy
The creation of a cleanup policy is available on three levels:
- Service:
- Creation is available only to service administrators.
- For policies created at this level, inheritance to any companies and projects is available.
- After going to the Admin Panel, the [Settings] section (../../admin_panel/settings) must select the Cleaning Policy Settings tab.
- Company:
- Creation is available only to company administrators.
- For policies created at this level, inheritance is available to projects of this company, including projects of subsidiary [teams and subgroups] (../../team/create).
- After [going to company settings] (../../company/settings), select the Cleaning Policies tab.
- Project:
- Creation is available only to project administrators.
- After going to the project settings, select the Cleaning Policies tab.
To create a policy, you must specify:
Basic
Service information for identifying a specific policy:
- Name - Is displayed on the policy list page. It can be up to 64 characters long and contain numbers, Latin lowercase letters, and the
-symbol. - Description is an optional field with any supporting information.
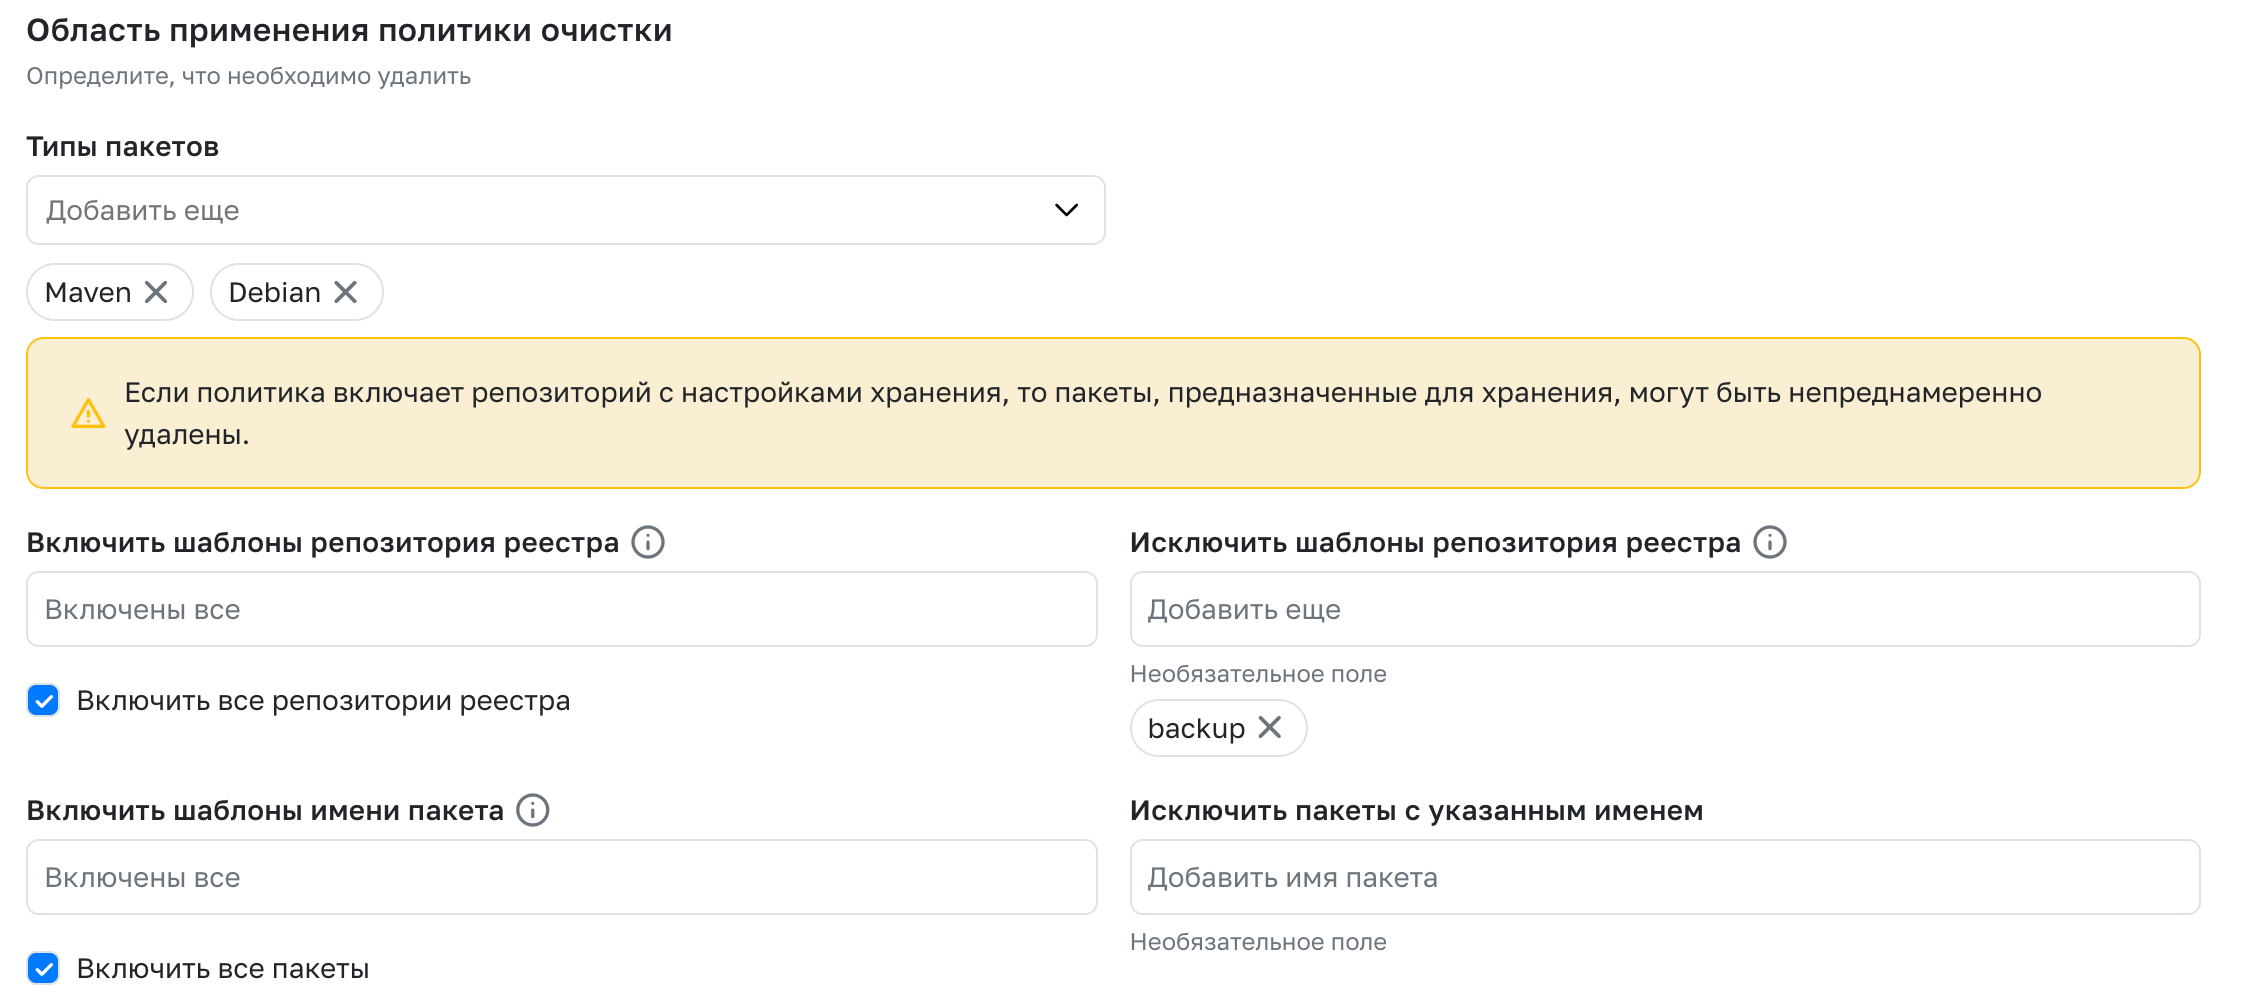
Scope of the cleaning policy
Settings that define the set of repositories and packages to which the policy will apply:
- Enabled projects and companies - Available when creating a policy at the company or service level. Defines the set of projects and companies to which this policy will be applied.
- Package Type - A list of package types for which repositories the cleanup rule will be triggered.
- Registry Repository Templates - Wildcard templates that define a set of repositories that will be affected by the policy. The Exclude Registry repository templates field allows you to remove specific repositories from the set.
- Package Name Templates - Wildcard templates that define the names of packages that will be affected by the policy. The Exclude packages with the specified name field allows you to cut off certain packages with the specified name.
Template examples
Template examples: repository-*, package-gtfl-?
* is a set of characters. For example, repository-* will match repository-gtfl-1 and repository-gtfl2.
? is a single character. For example, package-gtfl-?matches with package-gtfl-1 and package-gtfl-2'. Does not match thepackage-gtfl-test`.
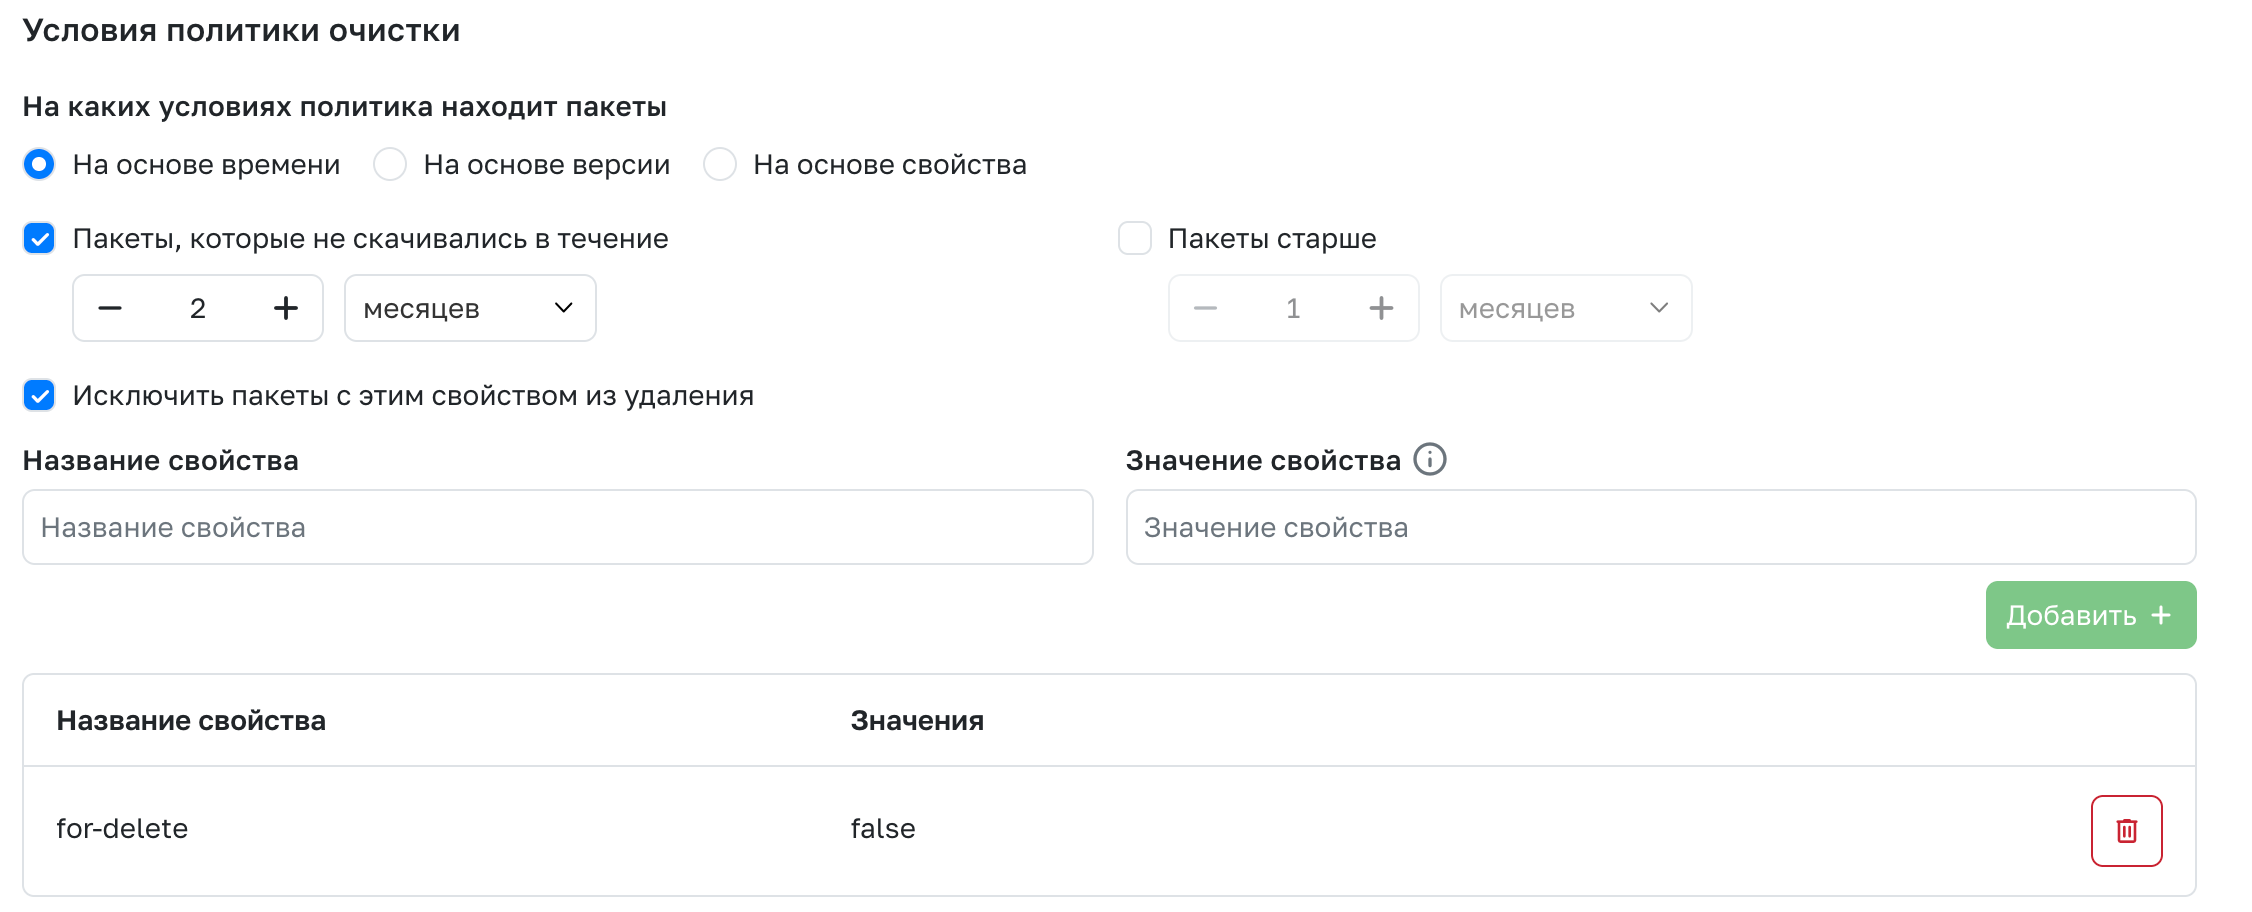
Terms of the cleaning policy
The condition for finding packages to be deleted. One of three possible conditions is available for selection:
- Based on time - Has two states:
- Packages that have not been downloaded during - All packages that have not been downloaded during the specified period of time will be marked for deletion.
- Packages older than - All packages with a download date older than the specified time period will be marked for deletion.
- Based on the version - Indicates the number of recent versions to be saved. The condition looks at the download date of the version, not its number.
- Based on a property - A property is a key-value pair that can be added to the entire repository, folder, or individual package. By the presence of the property or its value, the policy is able to compile a list of packages suitable for cleaning.
Package exclusion
For each condition, it is possible to exclude certain packages from the selection for deletion. After clicking Exclude packages with this property from deletion, you must create an exclusion property. Packages containing these properties will not be deleted by the policy, even if they fall under the purge condition.
Additional settings
Optional fields specifying how the policy works:
- The Cron expression is a schedule for policy execution. The minimum policy execution time is 6 hours. You can change the value using the
gitflic.atlas.cleanup-policy.latency-hoursproperty inapplication.propertiesof the application. The Cron format supports 5 digits: seconds, minute, hour, day of the month, month, day of the week. - Maximum startup duration - Defines the time interval beyond which the policy will not perform cleanup. When the limit is reached, the deletion process is interrupted.
- Deleting past the trash - Allows you to delete packages bypassing the trash.
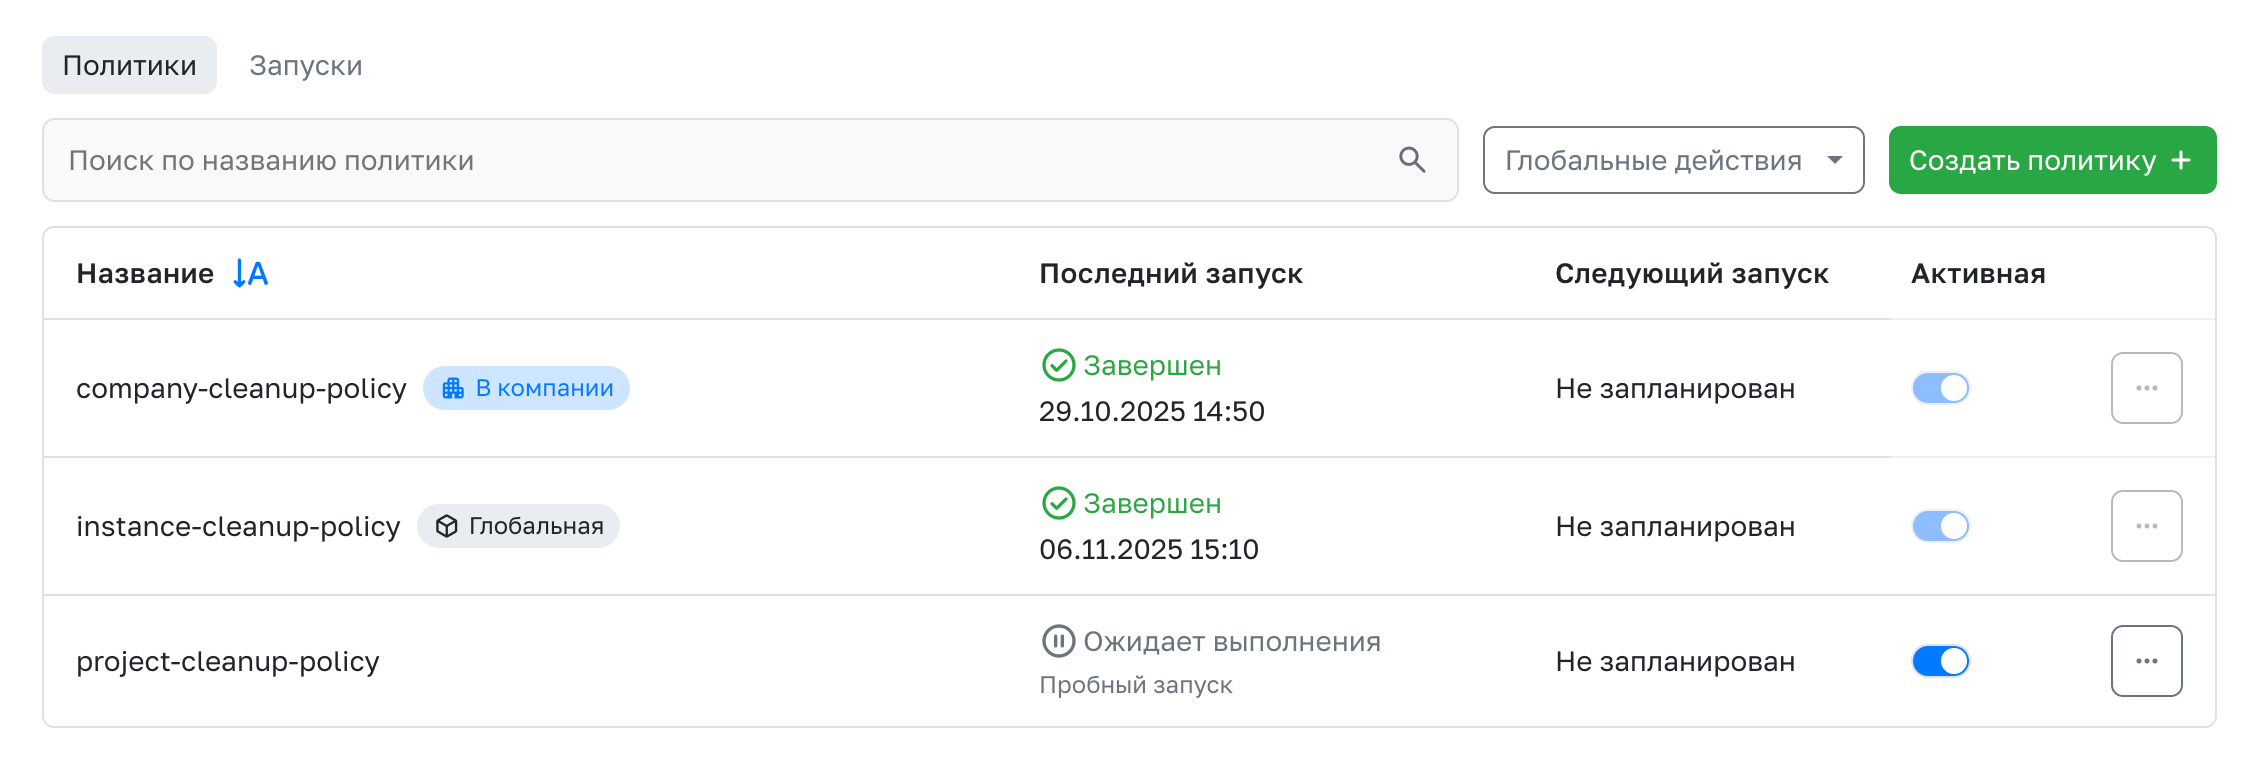
The work of the cleaning policy
The policy can be started manually via the drop-down menu or automatically, according to the Cron expression specified when creating the policy. For a trial run, to get a list of packages that will be cleaned without permanently deleting them, you need to use the corresponding function in the drop-down menu.
Policy activation
For any type of launch, the policy must be Active. By default, the policy is created in an inactive state. To activate it, use the toggle on the policy list page. The activity of the inherited policy can be managed only in the parent entity (company or admin panel).
The policy can clear up to 100,000 packets in one run. You can change the value using the gitflic.atlas.cleanup-policy.deleted-package-limit property in application.properties of the application.
Launches
The Launches tab displays a list of all policy launches with basic information: the name of the launched policy, the duration, and the number of cleared items.
Reports
The report contains detailed information about the policy launch in the .csv format.

Automatic translation!
This page has been automatically translated. The text may contain inaccuracies.