Working with Monorepositories in GitFlic
This documentation explores possible ways to ensure ease and comfort when developing large monorepositories using the Git version control system and the GitFlic platform. The following topics will be covered:
- Sparse-checkout and sparse-index
- Partial clone
- Shallow clone
These methods were tested on the Linux kernel repository, as well as large repositories like VSCode and Rust.
Characteristics of these repositories at the time of analysis:
-
Linux kernel
Number of commits: 1,293,367
Number of files: 85,719
Project size: 6.7 GB
Repository size: 5.2 GB -
Rust
Number of commits: 261,340
Number of files: 48,640
Project size: 1.6 GB
Repository size: 1.3 GB -
VSCode
Number of commits: 123,190
Number of files: 7,448
Project size: 1 GB
Repository size: 0.84 GB
It is also important to understand that the time required to execute commands and download repositories depends on your network bandwidth and internet speed.
Full Clone
To enable comparative performance analysis of the methods described above, you should first measure the default indicators of the git clone command.
Table 1. Clone performance with git clone.
| Repository | Clone time | Project size | Repository size | Number of files |
|---|---|---|---|---|
| Linux kernel | 847 sec | 6.7 GB | 5.2 GB | 85,719 |
| Rust | 173 sec | 1.6 GB | 1.3 GB | 48,640 |
| VSCode | 76 sec | 1 GB | 0.84 GB | 7,448 |
Sparse-checkout
This command allows you to abstract from working with a huge repository by focusing on a single required module or a few modules, making it feel like working in a small repository.
For example, let’s say we have a test project with the following structure:
- Client directory, which contains dependencies for 3 different platforms: Android, desktop OS, and iOS
- Service part, which contains all the service logic for several independent microservices
- Web part of the application, where some static web pages used by JavaScript are stored
It’s also important to note that there are several files at the root of the project.
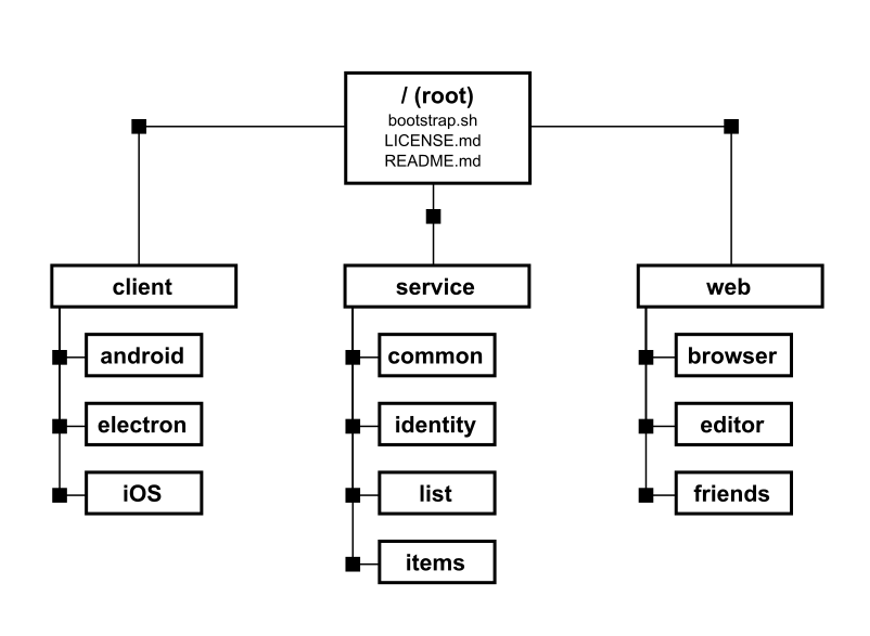
Each of these submodules can be nested up to 10 levels deep, but an individual developer may need to work only with a specific module.
To create the appearance of working only with that module, run the following commands in the project folder:
cd <target>
git sparse-checkout init --cone
git sparse-checkout set <dir1> <dir2> ... <dirN>
- The first command makes the repository appear as an entirely empty project, containing only the files located at the project root (e.g.,
README.md,.gitignore, etc.). - The second command sets which directories you want to see in the project. The directories are added using pattern flags similar to those in
.gitignore. In our case, the developer only needs theclient/androiddirectory, so the commands would look like this:
cd test_project
git sparse-checkout init --cone
git sparse-checkout set client/android
In this case, the mask for adding directories in the project will look like this:
/*
!/*/
/client/
!/client/*/
/client/android/
IMPORTANT: Since this command was used on an already existing full repository, we only get the appearance of working with a small repo, while in fact, all files are still present. For maximum benefit, you should clone the repo in sparse mode.
Cloning in Sparse Mode
To clone an empty repository without checking out a working branch, use the --no-checkout flag as follows:
git clone --no-checkout https://gitflic.ru/project/user/test_project.git
cd test_project
git sparse-checkout init --cone
git checkout master
This way, you get the state of the last commit but only files located at the root of the project.
How to Work Only with the Required Module?
Suppose you are an Android developer. According to the diagram, you only need the android directory in the client module. To avoid working with unnecessary modules, you can perform what’s called a sparse clone:
git clone --no-checkout https://gitflic.ru/user/test_project.git
cd test_project
git sparse-checkout init cone
git sparse-checkout set client/android
git checkout master

This way, you will only have the files necessary for your development, and you can still use the version control system to get updates and push your own changes.
Pros and Cons of Using sparse-checkout
The main advantage is that with sparse-checkout, the git pull command updates only those files within the sparse-checkout boundaries, not the entire project.
For example, the Linux repository contains 91,347 files, and even if not all are changed, git pull will update everything by default. With sparse-checkout, only 2,849 files are updated, which is much faster.
The downside is that to load additional files, you need internet access and a connection to the remote server. Without this, your local git won’t be able to fetch the needed parts of the project.
For maximum benefit, you can combine sparse-checkout with partial clone.
Using partial clone with sparse-checkout
First, to understand what partial clone is, visit this link.
In short, the partial clone command allows you to clone only a part of the repository based on the --filter flag.
Here’s how to use it. Clone the repository with the --filter=blob:none flag and without checking out a branch:
git clone --filter=blob:none --no-checkout https://gitflic.ru/project/user/test_project.git
cd test_project
git sparse-checkout init --cone
git checkout master
git sparse-checkout set client/android
Now your project will contain only the files at the root and those related to the client/android submodule.
See the characteristics of the resulting project after these commands:
Table 2. Results of partial clone with sparse-checkout
| Repository | Clone time | Project size | Repository size |
|---|---|---|---|
| Linux kernel | 145 sec | 1.8 GB | 1.7 GB |
| Rust | 45 sec | 526 MB | 509 MB |
| VSCode | 16 sec | 311 MB | 227 MB |
As you can see, cloning time decreased by 6-7 times compared to a full clone, and project size also dropped about 4 times.
How to Run Such a Project?
This method is very convenient, but if a submodule is missing required dependencies, the project will not run, as the missing files remain in the remote repository. This is neither a plus nor a minus of the commands themselves—just something you need to be aware of when working this way.
What is partial clone and how does --filter work?
As described above, partial clone with the --filter flag lets you copy only part of the repository.
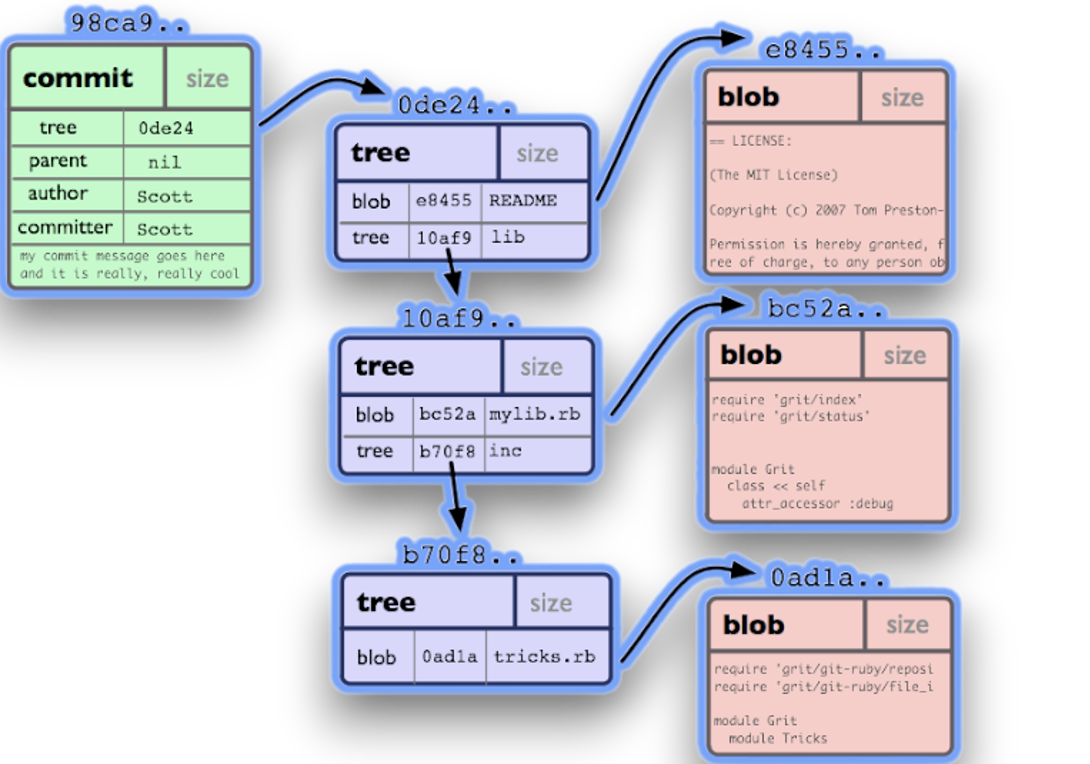
For clarity, here are symbolic designations for git objects:
- Blob — represented by squares. This is the file content.
- Tree — represented by triangles. This is a directory in the project.
- Commit — represented by circles. These are snapshots of the repository state at a point in time.
There are three main ways to reduce the size of a cloned repository:
git clone --filter=blob:none <url>creates a blobless clone, best for ongoing development.git clone --filter=tree:0 <url>creates a treeless clone, best when you only need a single build and need full commit history.git clone --depth=1 <url>creates a shallow clone.
Let's consider each method separately.
Blobless Clone
This method loads information about all available commits and trees from the repo root without blobs. Blobs are downloaded "on demand"—when you access them (e.g., during git checkout). This includes the initial checkout after git clone.
After cloning, you have all commit and tree data, but file contents are loaded only as needed. Commands like git log or git merge-base don’t trigger blob downloads.
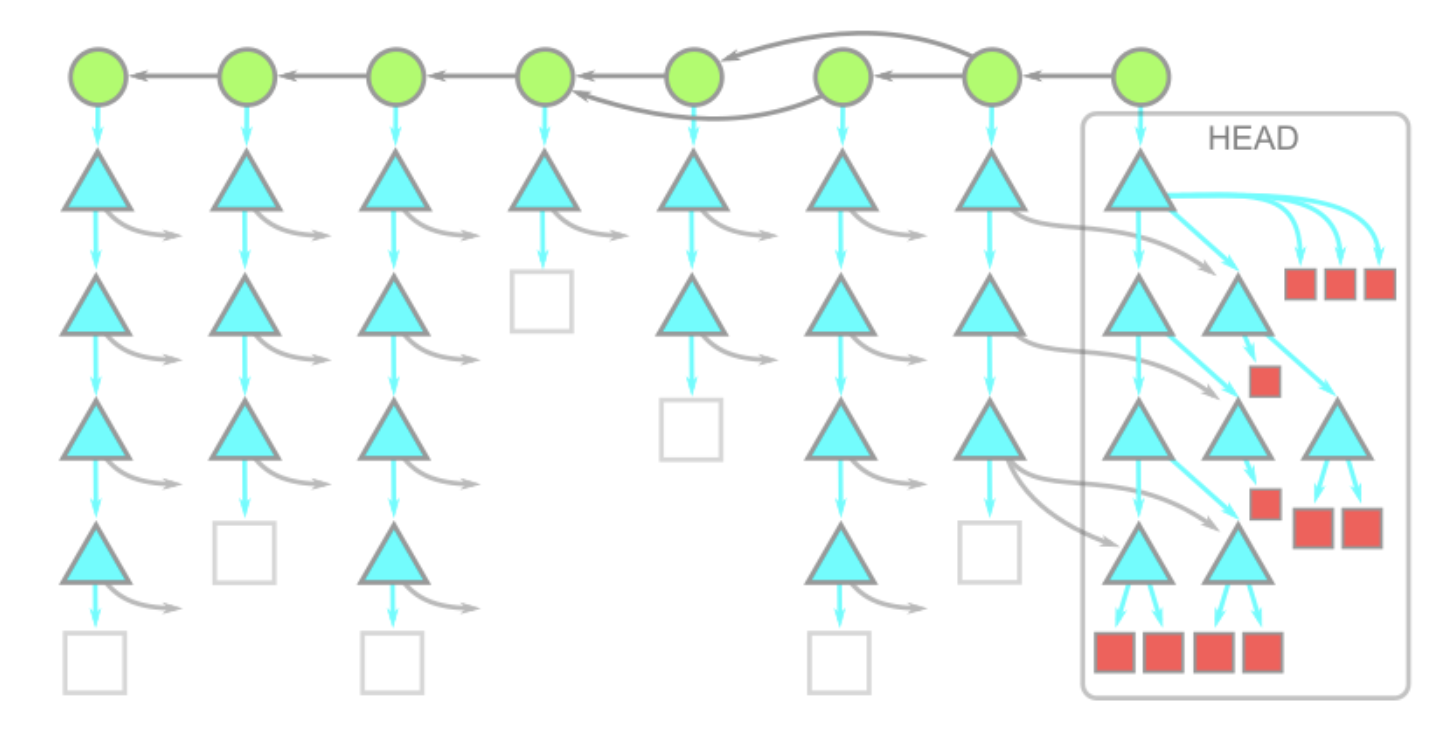
When using git fetch or git pull, only commit or tree changes are fetched; new blobs are loaded only when required.
Results for blobless clone:
Table 3. Results of git clone --filter=blob:none
| Repository | Clone time | Project size | Repository size |
|---|---|---|---|
| Linux kernel | 177 sec | 3.5 GB | 2 GB |
| Rust | 49 sec | 816 MB | 542 MB |
| VSCode | 16 sec | 360 MB | 233 MB |
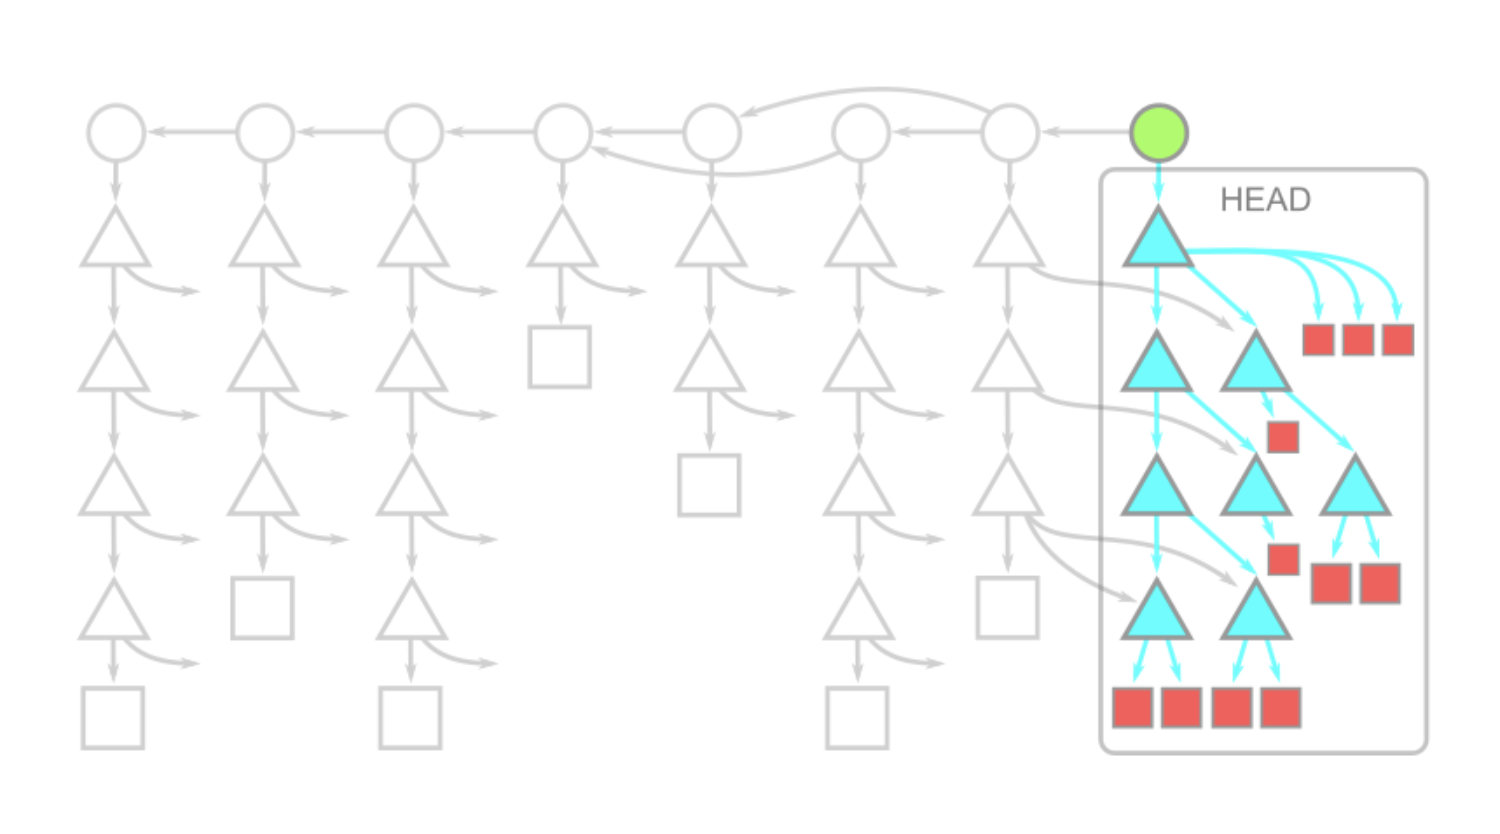
Treeless Clone
This method loads the full commit history, but blobs and trees are loaded only "on demand." The current commit (HEAD) is loaded fully, but the rest contain only commit info.

With treeless clone, git log and git merge-base work correctly, but commands like git log -- <path> can be very slow.
If your project has submodules, treeless clone may not work well. You should run:
git config fetch.recurseSubmodules false
Results for treeless clone:
Table 4. Results of git clone --filter=tree:0
| Repository | Clone time | Project size | Repository size |
|---|---|---|---|
| Linux kernel | 52 sec | 2.5 GB | 978 MB |
| Rust | 10 sec | 422 MB | 149 MB |
| VSCode | 4 sec | 199 MB | 73 MB |
Shallow Clone
Partial clone is relatively new compared to shallow clone. Shallow cloning uses the --depth=<N> flag to cut commit history. With --depth=1, you get a project with a single commit. It’s best to use this with --single-branch --branch=<branch> to guarantee you get only the data you need.
Because the commit history is cut off, commands like git merge-base and git log won’t work as expected.
Also, with shallow clones, git fetch may end up downloading almost the full history, which can be more expensive than normal fetches. For this reason, it is not recommended to use shallow clones except when the repository will be deleted after a single build.
Results for shallow clone:
Table 5. Results of git clone --depth=1
| Repository | Clone time | Project size | Repository size |
|---|---|---|---|
| Linux kernel | 19 sec | 1.8 GB | 268 MB |
| Rust | 2.7 sec | 314 MB | 41 MB |
| VSCode | 2 sec | 147 MB | 21 MB |
Summary
Key points for the reviewed commands:
- Shallow clone removes commit history, breaking
git logandgit merge-base. Never rungit fetchif you use shallow clones. - Treeless clone contains only the commit history, but loading new trees is expensive. Still,
git logandgit merge-basework correctly, but commands likegit log -- <path>are very slow and not recommended for this clone type. - Blobless clone contains all reachable commits and trees, so git only loads file contents as needed. This means commands like
git blameare slower the first time they’re run. However, it’s a great way to work with large repositories with lots of old, large files. - Full cloning works as expected, but the load time and disk space usage are very high.
Automated translation!
This page was translated using automatic translation tools. The text may contain inaccuracies.