ldap.md
LDAP Installation and Configuration
Functionality is available in Enterprise, Atlas, and On-premise versions. This functionality is guaranteed to work with: OpenLDAP or FreeIPA.
Creating an LDAP Connection
To create an LDAP connection, go to the admin panel, open the SSO Settings section, and in the LDAP Configuration section, click the Create button.

Configuring an LDAP Connection
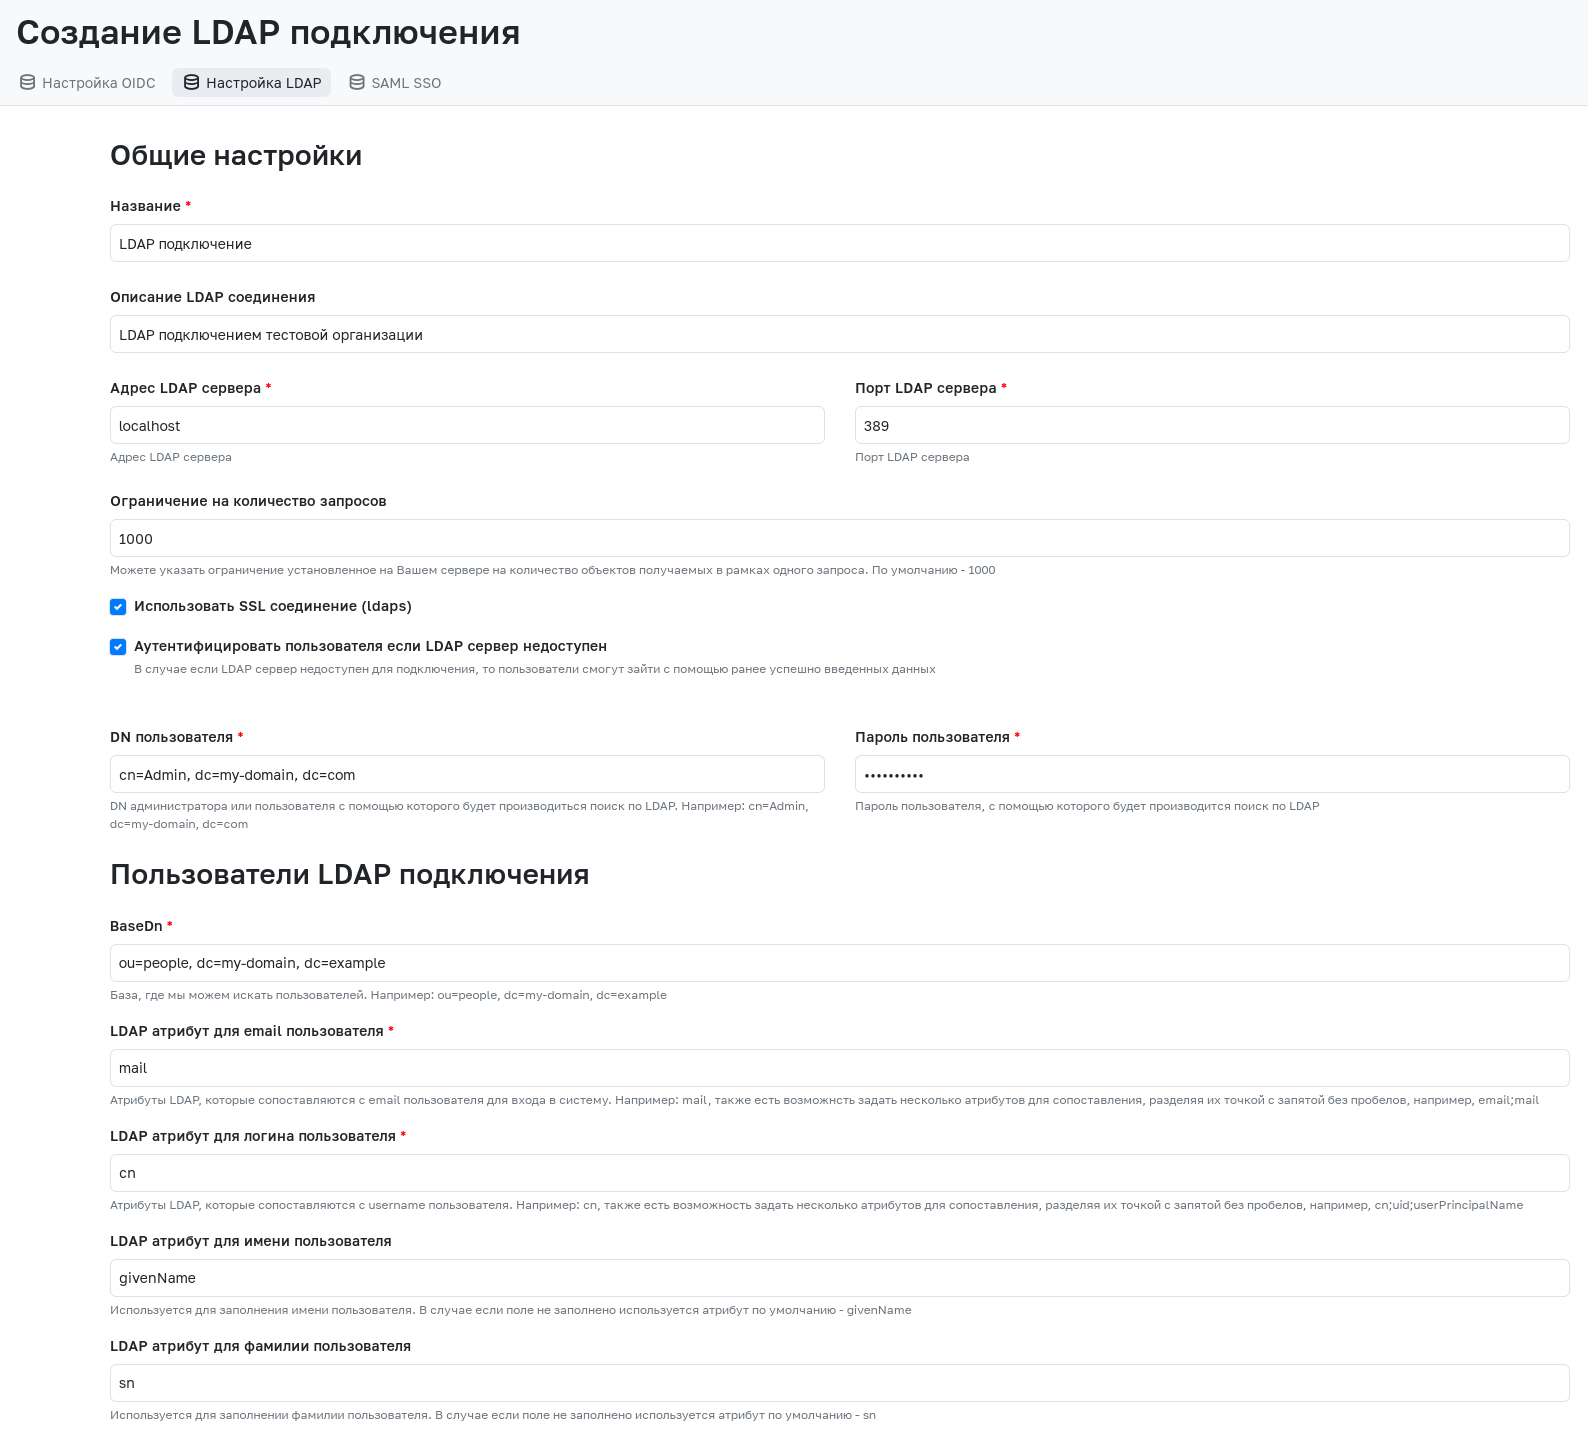
When creating a new LDAP connection or editing an existing one, the following mandatory fields must be filled in:
Attention!
Do not use LDAP attributes that return values in hexadecimal format. This may lead to incorrect data processing in the application.
- Name - The name of the LDAP connection, which will be displayed in the admin panel, on the LDAP login page, or on the group synchronization page.
- LDAP Server Address - The address where the LDAP server is located (if running locally, specify localhost).
- LDAP Server Port - The LDAP server port (default port is 389).
- User DN - The DN of the administrator or user used to perform searches in LDAP.
- User Password - The password of the user used to perform searches in LDAP. The password must be re-entered when editing an existing connection.
- BaseDn - The LDAP server DN for searching users.
- LDAP Attribute for User Email - LDAP attributes mapped to the user's email. For correct LDAP integration, it is recommended to use an email of the form
mail@domain.ruin this attribute. Multiple attributes for mapping can be specified, separated by semicolons without spaces. - LDAP Attribute for User Login - LDAP attributes mapped to the user's login. These attributes must be unique for each individual user. Login to the system is performed using one of these attributes. Multiple attributes for mapping can be specified, separated by semicolons without spaces. Upon first login to GitFlic, a user will be created, using the first non-empty attribute from this field as the login.
- User UID - A unique and immutable LDAP attribute required for user identification.
The User UID field is available in GitFlic starting from version 4.0.0. After updating from an older version, this field will be automatically filled with the first value from the LDAP Attribute for User Login field. For the system to work correctly, it is recommended to manually set
uidas the attribute containing the globally unique user identifier, for example -sAMAccountName. Please note that GitFlic currently does not support attributes from Active Directory such asobjectGUIDandentryUUID.
The fields described below are not mandatory for creating an LDAP connection, but filling them in can make user synchronization more complete:
- LDAP Attribute for User First Name - Attribute for populating the user's first name. If the field is empty, the default attribute is used - givenName.
- LDAP Attribute for User Last Name - Attribute for populating the user's last name. If the field is empty, the default attribute is used - sn.
- LDAP Connection Description - Description displayed in the GitFlic admin panel.
Additionally, the LDAP connection settings include additional parameters:
- Use SSL connection (ldaps) - Allows the use of an SSL connection in the LDAP connection. More details about this function can be found here.
- Authenticate user if LDAP server is unavailable - Allows users to log in using previously successfully entered credentials if the LDAP server is unavailable. More details about this function can be found here.
- Request Limit - Specifies the limit set on the server for the number of objects retrieved in a single request. Default - 1000.
- Ignore case when checking login - Allows logging into the service without considering login case.
After filling in the required fields, click the "Create" button. After successful creation, you will be redirected to a page listing all created LDAP connections.
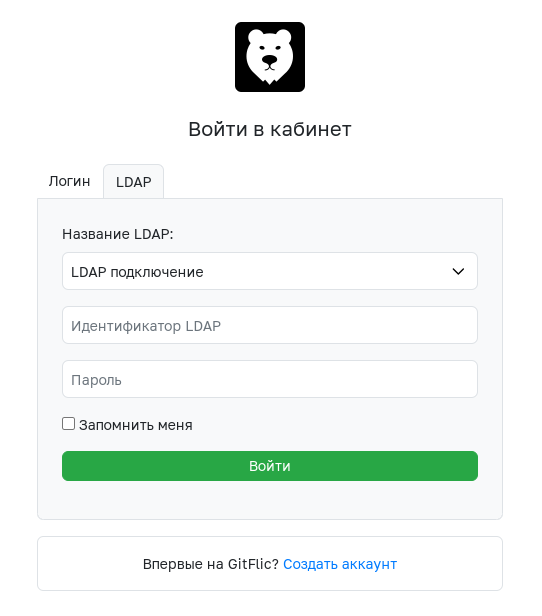
Login via LDAP
On the login page, select the LDAP section. After entering the credentials provided by the administrator, click the "Login" button.
LDAP Group Synchronization
Functionality is available in the Enterprise version.
This function is designed for automatically transferring user groups to GitFlic according to the group structure in the LDAP directory (e.g., ALD Pro, Active Directory). This allows: automating access management processes, simplifying compliance with company policies, reducing the impact of human error.
Configuring LDAP Group Synchronization
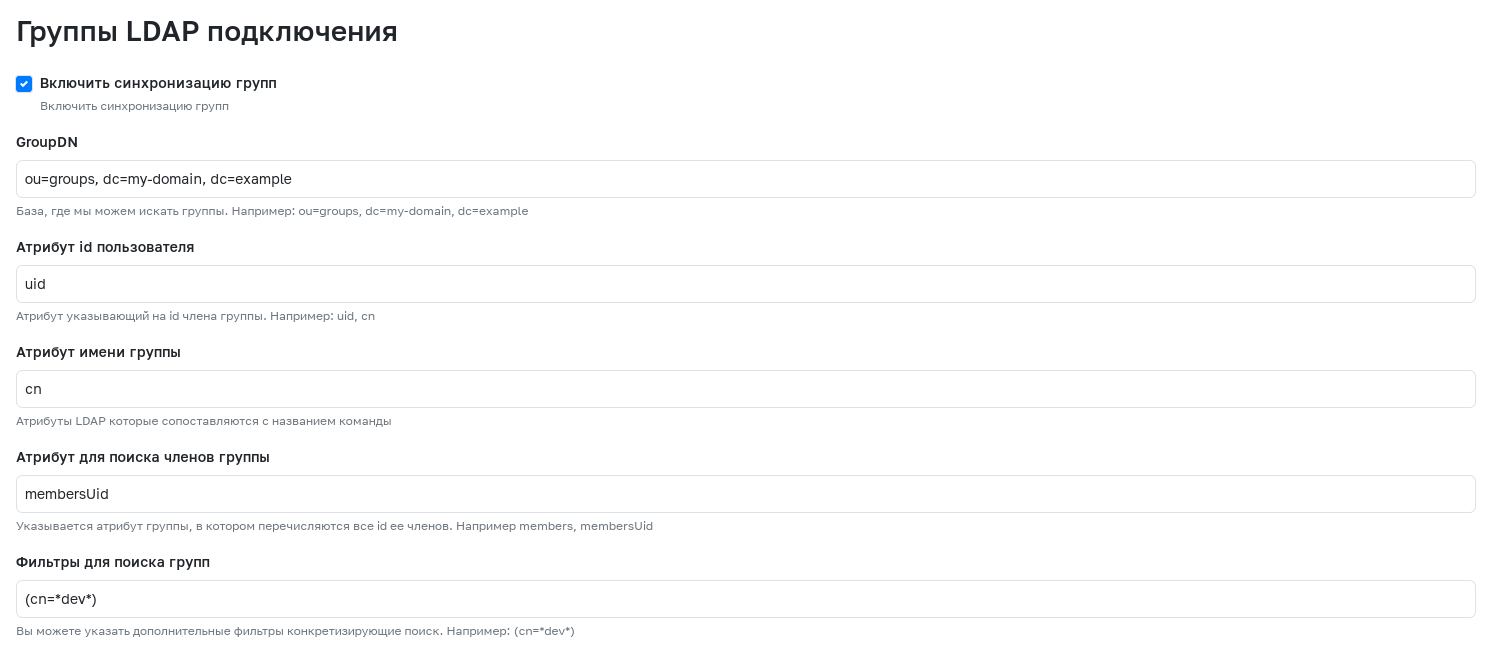
To activate synchronization of LDAP groups with teams or companies in GitFlic, use the "Enable group synchronization" setting. To create an LDAP connection with active group synchronization, the following mandatory fields must be filled in:
- GroupDN - The LDAP server DN for searching groups.
- User ID Attribute - Attribute indicating the group member's ID.
- Group Name Attribute - Attribute indicating the group's name.
- Attribute for Searching Group Members - Group attribute listing all its members' IDs.
For more flexible group synchronization configuration, the following optional filters can be used:
- Filters for Group Search - Filter specifying the group search.
Applying LDAP Group Synchronization
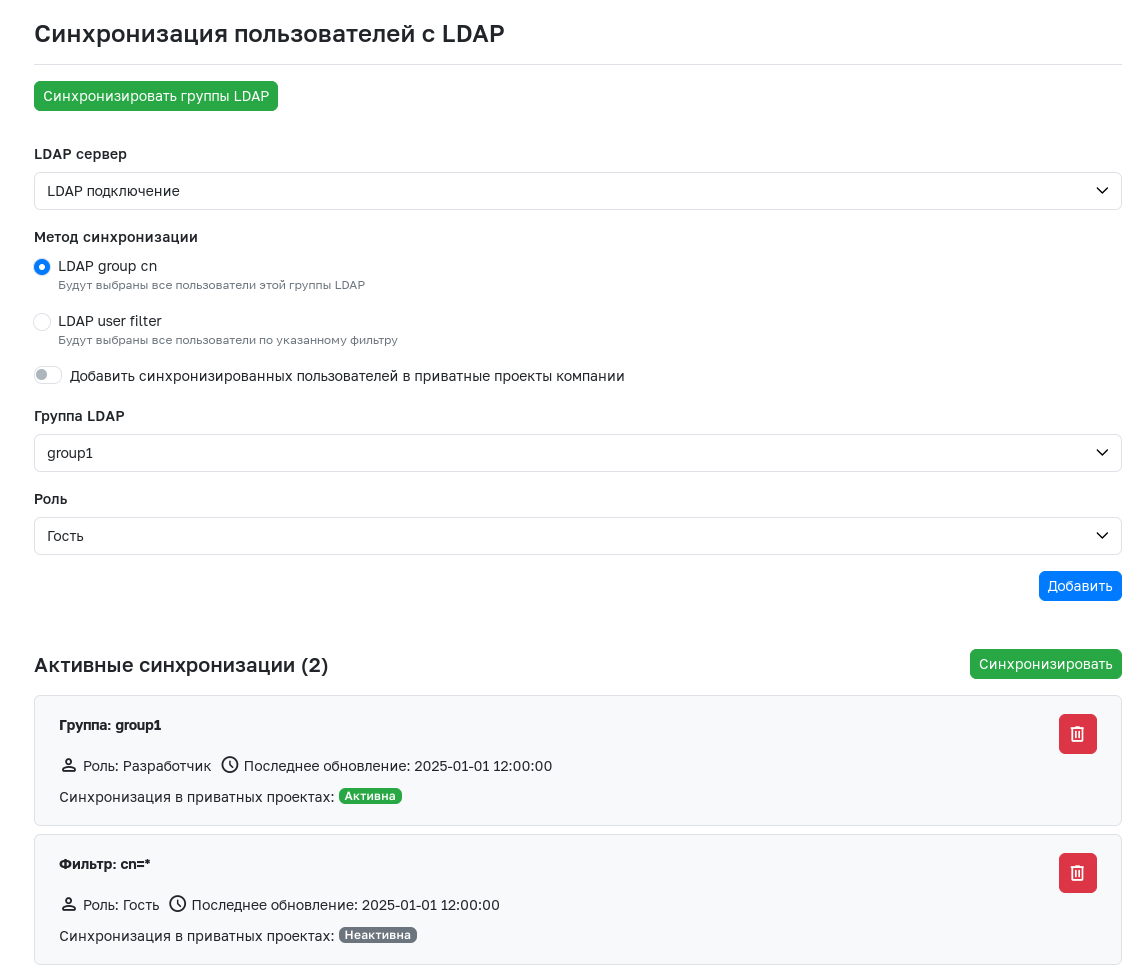
After configuring the LDAP connection with all necessary parameters for group synchronization, the LDAP Synchronization tab becomes available for administrators of teams and companies.
Groups specified in the LDAP connection settings do not appear in GitFlic immediately - the built-in mechanism updates information about them once per hour. The Synchronize LDAP Groups button allows you to avoid waiting. Clicking it triggers synchronization, and up-to-date information about LDAP groups becomes available in GitFlic. Therefore, starting any interaction with the group synchronization functionality is recommended by clicking this button.
The LDAP server selector allows you to choose a specific connection whose groups need to be added to the team or company. There are two synchronization methods:
- LDAP group cn - Selecting a group from a list automatically generated based on the LDAP connection's group synchronization settings.
- LDAP user filter - Forming a group using a specified filter.
After selecting a group using one of the methods, you must choose the role that all users in the specified group will receive upon synchronization with the team or company.
To add users from the selected group to all projects of the team or company where synchronization is occurring, activate the toggle Add synchronized users to company projects. After activating the toggle, a selector will appear where you must choose the role with which users will be added to projects. You can select either a basic or a custom role.
- If a user is synchronized into team or company projects via multiple groups, they will be assigned the highest role. When comparing custom roles, their base roles are compared.
For example, a user is in group1, added for synchronization with the option to add to projects activated with the Guest role, and in group2, added for synchronization with the option to add to projects activated with a custom role whose base role is Developer. In this case, the user will be added to the project with the custom role, because its base role Developer is higher than the Guest role (the set of permissions in the custom role is not important).
- If a user is synchronized into team or company projects via multiple groups with different custom roles that have the same base role, the role from the group that was added for synchronization last will be chosen for adding to the project.
After clicking the Add button, the group goes to the Active Synchronizations section. After adding a sufficient number of groups, click the Synchronize button, after which all group members will receive the specified roles in the team or company.
- If a user is present in multiple groups, they will be assigned the highest role during synchronization.
For example, a user is in group1, added for synchronization with the Guest role, and in group2, added for synchronization with the Developer role. Then, after clicking the Synchronize button, this user will receive the Developer role in the team or company where synchronization is performed.
- If synchronization is performed in an entity owned by a company or team, the user will be added to the parent company with the Guest role during synchronization.
For example, synchronization is performed in a subgroup. Then, during synchronization, the user will be added to the company that is the parent of the team within which this subgroup was created.
- Before synchronizing groups, it is necessary to log in with an LDAP user account to create a profile in GitFlic.
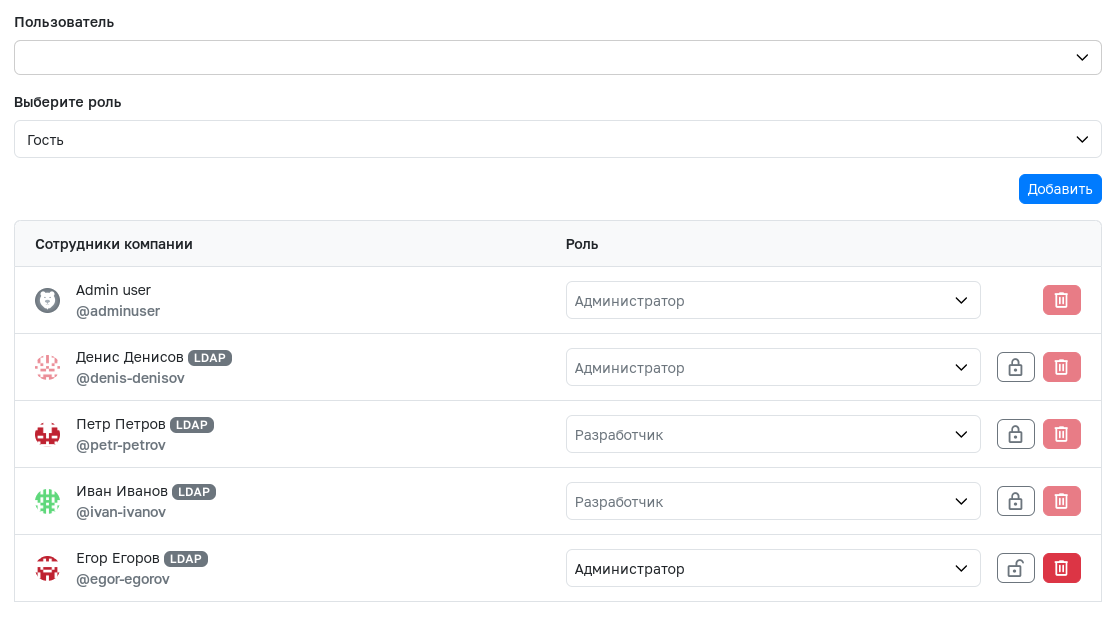
Managing Synchronized Users
Users added to a team or company via group synchronization are locked for changes in the Access Management section. To change the role or delete such users, the lock must be removed using the lock-shaped button. After subsequent synchronization, the roles of these users will not be changed.
- If a user is deleted from a team or company after removing the lock, during the next synchronization this user will again gain access with the role assigned to their group. To permanently remove a user, it is recommended to delete them from the LDAP server configuration itself and perform re-synchronization of both the LDAP connection and the LDAP groups.
- If it is necessary to restore the user's role to the one with which their group was added to the team or company, the user must be locked again and the Synchronize button must be pressed again.
Additional Information on Working with LDAP
-
In
application.properties, it is recommended to specify the parametergitFlic.aes.secret, which is used as a password for encrypting the LDAP database password. You can set your own password or assign nothing, in which case the standard password is used (unsafe). -
The server stores a hash of the password, which is used only if the checkbox "Authenticate user if LDAP server is unavailable" is checked. When a user logs in, if the LDAP server is unavailable, GitFlic compares the hash in the database and the entered password. If the checkbox is not set, then if the server is unavailable, the account is blocked: it will be impossible to work with the project via ssh, tokens become invalid, etc.
-
When working via https, with every request to GitFlic (clone, push, pull, etc.), GitFlic accesses the LDAP server, and if the LDAP server is unavailable, the user is blocked. When working via ssh, such a check is not performed, i.e., if a user is blocked in the LDAP system, access to the web interface and git work via http will not work, but if the user continues to work via ssh, their account in GitFlic will not be blocked.
-
GitFlic has a worker configured to access the LDAP server once per hour to check and update users. The process performs the following access checks:
- Checks that the user is still present in LDAP.
- If the LDAP server is Active Directory, ensure the user is active (not locked/disabled). In Active Directory, a user is marked as disabled/locked if bit 2 is set in the user's account control attribute (
userAccountControl:1.2.840.113556.1.4.803). (Bitmask searches in LDAP)
-
For immediate user blocking, users can be manually blocked in the GitFlic service admin panel.
-
The first and last name fields are populated from the attributes
givenName(first name) andsn(last name). After the first login, these parameters can be manually overridden.
Adding a Local Certificate for LDAPS Operation.
If a local certificate is required for working with LDAPS, besides adding it to the server where GitFlic is running, the certificate must also be imported into the JRK. If this action is not performed, when checking the Use SSL connection (ldaps) box in the LDAP settings, the message Error creating LDAP connection: simple bind failed will appear in the logs. For certificates verified through global certification authorities, these settings may not be necessary.
Ubuntu
- Find out where the Java certificate folder is located. To find the location of
$JAVA_HOME, execute the command:
readlink -f /usr/bin/java | sed "s:bin/java::"
cacerts is located in lib/security/cacerts. The entry below can be used as a variable with the correct path to cacerts.
$(readlink -f /usr/bin/java | sed "s:bin/java::")lib/security/cacerts
- Perform certificate import.
keytool -import -alias <alias> -file <file_path> -keystore $JAVA_HOME/lib/security/cacerts
The example below uses:
* -alias ya.ru
* Full path to the certificate -file ~/tmp/ya.crt
* Path to JRK certificates -keystore /usr/lib/jvm/java-18-openjdk-amd64/lib/security/cacerts
keytool -import -alias ya.ru -file ~/tmp/ya.crt -keystore /usr/lib/jvm/java-18-openjdk-amd64/lib/security/cacerts
When prompted for a password Enter keystore password:, try just pressing Enter or using the password changeit.
View certificates with the command:
keytool -list -v -keystore $(readlink -f /usr/bin/java | sed "s:bin/java::")lib/security/cacerts
Automatic Translation!
This page has been translated by automatic translation. The text may contain inaccuracies.